• Please only use these forums for blogs, they are not a discussion forum

PollyMobiles Rebuild

Pictures not showing Paulo_O

Yeah the server ain't letting me upload pics from pc browser so I'm just trying to upload pics from the phone app but doesn't work. Gonna reattempt to upload via desktop browser later tonight.

James, have you checked the server condition?

k I think the server is running out of space cos during editing, I can briefly upload 3-4 pics and then it says "images too large for server to upload" and then "error uploading file", even though it's a tiny 400x400 jpg, and keeps giving that error afterwards :/
 
Last edited:
James just fixed the slight database issue after I posted on fb, thx m8 ;)

new bearing fitted

IMAG6260.jpg
IMAG6261.jpg


longer studs installed

IMAG6262.jpg


begin assembling the front hub

IMAG6263.jpg
IMAG6264.jpg
IMAG6265.jpg
IMAG6266.jpg
 
the brake hose mount is abit closer to the chassis now that the hub has shifted inwards

IMAG6269.jpg


removed the springs so I can push the strut through it's full travel

IMAG6267.jpg


with the hub fully compressed up at full lock, I adjusted the mount to clear the chassis

IMAG6271.jpg
 
the o-ring used at the top of the ball joint cover was just too soft and will let water seep into the bearing, so I used a zip tie to keep it tight

IMAG6272.jpg


front hubs assembled

IMAG6275.jpg


marked the locknut position and check the wheel still clears

IMAG6276.jpg
IMAG6279.jpg


here's how it now sits, much better

IMAG6281.jpg


the longer studs are perfect

IMAG6278.jpg


even with the top camber plate set at max, the front wheels now sit only approx 1deg camber from the rears. will find out how much it's all changed once I begin alignment stage

IMAG6282.jpg


the old geometry used to be like this. ball joint was just above the front bushing and roll centre really low

old geo.jpg


and now with the balljoint extended 40mm it's hugely better, roll centre much higher and closer to the CoG

new geo.jpg


once I've realigned everything, we'll see how it feels :)
 
tie rod end wasn't going in fully

IMAG6283.jpg
IMAG6284.jpg


so I trimmed the rod

IMAG6285.jpg


aligning the wheels with 1.2deg camber & 0.10deg toe out

IMAG6286.jpg


the front wheel sits slightly more inward with 1.2 deg negative camber

IMAG6289.jpg


went for a brief drive in the countryside with the new geometry and wow what a different cornering behavior.
the steering still has the vague sluggish feel near 2-3deg dead-centre, could do with a quicker steering rack tbh.

but beyond 2deg steering when going round low-speed tight corners or roundabouts she corners soo flat, the body doesn't roll at all now. :)

at high speed sweeping corners, she's always so flat, planted, minimal roll and just turns sharp, immediate and stable.
if I wiggle her at high-speed, the rear end does feel abit wobbly, delayed & soft. tis probably due to soft damper settings and lack of X-brace stiffening the chassis flex.

the right turn whirring noise has gone after replacing the left wheel bearing.

looking at the angle of the lower arms & steering arm, I will also need to mod the tie-rod end to sit lower down at the same angle of the lower arm cos when the suspension droops, the wheels point 3-5 deg toe-in.

with the hub sitting closer inwards and with maximum camber setting, the front tyres rub on the chassis at full lock so will have to limit my steering when parking.
Hmm I'm thinking I'll make another 8mm spacer for the front wheels.

the steering wheel is getting abit old and worn where the rubber has separated from the steel core.
so I ordered a 2001 facelift airbag steering wheel from ebay that's hopefully in better condition.

wheel.jpg
 
Last edited:
is there any way to fit a backup/failsafe washer in the purple part paul ? because the diameter difference between the 2 arrowed parts is pretty small eh

ball_joint_dust_cover.jpg
 
is there any way to fit a backup/failsafe washer in the purple part paul ? because the diameter difference between the 2 arrowed parts is pretty small eh

View attachment 54082

no cos any wider and it'll foul the sides, any taller and the bolt will foul the wheel.
the spherical bearing at the top of the BC coilover strut is exactly the same type and under even more stress as the bottom one and there's been zero issues with them.
the bottom spherical bearing is rated for 32-78kN loads so it'll be perfectly fine imo.
 
is there any way to fit a backup/failsafe washer in the purple part paul ? because the diameter difference between the 2 arrowed parts is pretty small eh

View attachment 54082
Probably not much different to the original ball/socket joint Frank, but as the stress/wear factors of the joint, in Paul's application, are unknown, VERY regular inspection, checking for any play/looseness, is highly recommended. Also the actual duty/spec of the bearing is an unknown, is the manufacturer a 'known' high quality maker? In this application I would only use the very best, SKF, INA, Timken, etc with a known manufacturing and quality control history, as well as specification data that can be accessed....
My initial concern with Paul's design was the strength of the welded attachment of the top yellow retaining component to the wishbone, and while Paul's MIG welding looks to be good, penetration is still an unknown factor.........
In an industrial scenario firstly the application would be CAD modelled, with ALL of the actual material strengths factored in and stress/load points being shown/measured at all angles of the joint movement and then the actual physical joint being put in a test rig and tested to destruction......
the factory balljoint is retained by a steel enclosure tho john, that is about 5mm smaller dia than the sphere
and that allows for a lot of wear before it would pull through, i changed a bottom b/j on a clio once that was rattling like mad on a rough road, and was barely retained

P6040002.JPG
 
Probably not much different to the original ball/socket joint Frank, but as the stress/wear factors of the joint, in Paul's application, are unknown, VERY regular inspection, checking for any play/looseness, is highly recommended. Also the actual duty/spec of the bearing is an unknown, is the manufacturer a 'known' high quality maker? In this application I would only use the very best, SKF, INA, Timken, etc with a known manufacturing and quality control history, as well as specification data that can be accessed....
My initial concern with Paul's design was the strength of the welded attachment of the top yellow retaining component to the wishbone, and while Paul's MIG welding looks to be good, penetration is still an unknown factor.........
In an industrial scenario firstly the application would be CAD modelled, with ALL of the actual material strengths factored in and stress/load points being shown/measured at all angles of the joint movement and then the actual physical joint being put in a test rig and tested to destruction......

yea no different to any other spherical, rose or ball joint bearing used everywhere that has to comply with various standards.
it's an SKF GEH17C from simplybearing.com with lotsa data bout them.

I regularly check the car, especially after each trackday and the bearing is real easy to swap if it does wear out.
it'll make a noise when it's abit worn loose.
I'm not the average driver who may ignore & neglect a knocking worn bearing till the wheels fall off lol.

I designed it to be as beefy as possible and welded to my best quality and confident it'll hold.
it's no different to any other private car builder, we fabricate & run our cars at our own risk with calculated educated risks.

in industrial commercial public application, when things are sold to the public, I agree there are severe quality standards & product testing to pass in order to guarantee to the publics trust that a major manufacturers product (or any public engineering/fabrication firm) will perform safely for a given period & condition or else the company is liable for damages or harm.

but this ain't an industrial scenario nor publically sold item.
it's a private built prototype car like any other back shed custom built car. it's our own responsibility, own risk to design & quality check our work the same as any fabrication, engineering place would.
would be a nice luxury to test it to destruction but I ain't got that luxury or resources. I just trust the purchased bearing is high quality, the oem arm is strong and my engineered parts perform as I intended from my design engineering experience.
 
the factory balljoint is retained by a steel enclosure tho john, that is about 5mm smaller dia than the sphere
and that allows for a lot of wear before it would pull through, i changed a bottom b/j on a clio once that was rattling like mad on a rough road, and was barely retained

View attachment 54083

the thick outer casing is the same for both ball joint/spherical.
the ratio between the sphere outer diameter and the enclosure opening is the same so they'd both have the same chance of wearing through.

if the joint was that worn and knocking so badly that it pops out, well that's just the owners stupidity for neglecting a worn part.
 
jacked the front up to roughly check the bump/droop steer

IMAG6293.jpg


using the laser level to mark the wheel angle

IMAG6294.jpg


whenever the wheel drops from static ride height down to full droop, it toes-in by upto 4deg! that's bad

IMAG6295.jpg


if I can somehow mount the standard tie-rod end (or an aftermarket female rod-end rose joint) from underneath the hub, it'll bring the steering arm closer to the angle of the lower arm

IMAG6296.jpg
IMAG6297.jpg


the tyre hits the chassis at full lock cos the hub has moved inwards from the full camber and ball joint extension

IMAG6303.jpg


so, thankfully I still have my old grooved pulsar discs and made them into 8mm spacers

IMAG6298.jpg
IMAG6299.jpg
IMAG6300.jpg
IMAG6301.jpg


now it just about barely clears the chassis at full lock :cool:

IMAG6305.jpg


with all the wheels spaced 8mm, they now sit nicely in the arch the same as before the geometry mod

IMAG6307.jpg
IMAG6308.jpg
 
whenever the wheel drops from static ride height down to full droop, it toes-in by upto 4deg! that's bad
I don't think it's linear, so it is not as bad as it might suggest and at full droop there's going to be very little weight on the wheel. Full bump will be more important I think.
Afaik it doesn't need to match the lower arm but rather the steering arm needs to point to the same virtual centre as the suspension arms and the pivots (tie rod end and rack end) need to be inline with the suspension pivots. The bottom one will have changed
 
jacked the front up to roughly check the bump/droop steer

View attachment 54091

using the laser level to mark the wheel angle

View attachment 54086

whenever the wheel drops from static ride height down to full droop, it toes-in by upto 4deg! that's bad

View attachment 54088

if I can somehow mount the standard tie-rod end (or an aftermarket female rod-end rose joint) from underneath the hub, it'll bring the steering arm closer to the angle of the lower arm

View attachment 54090 View attachment 54089

the tyre hits the chassis at full lock cos the hub has moved inwards from the full camber and ball joint extension

View attachment 54096

so, thankfully I still have my old grooved pulsar discs and made them into 8mm spacers

View attachment 54092 View attachment 54095 View attachment 54093 View attachment 54094

now it just about barely clears the chassis at full lock :cool:

View attachment 54087

with all the wheels spaced 8mm, they now sit nicely in the arch the same as before the geometry mod

View attachment 54084 View attachment 54085
By using those plain 8mm spacers Paul, you have lost the rather important hub centric location for the wheels.....
 
I don't think it's linear, so it is not as bad as it might suggest and at full droop there's going to be very little weight on the wheel. Full bump will be more important I think.
Afaik it doesn't need to match the lower arm but rather the steering arm needs to point to the same virtual centre as the suspension arms and the pivots (tie rod end and rack end) need to be inline with the suspension pivots. The bottom one will have changed

in it's current form, when drooping over a crest, both wheels pointing 4deg inwards and the last wheel to leave the ground would nudge the front end to one side till the car drops back down.
will find out the full bump / droop steer once I remove the springs and measure alignment throughout the strut travel and adjust the steering geometry with the new rod ends till it keeps straight through most of the travel
 
By using those plain 8mm spacers Paul, you have lost the rather important hub centric location for the wheels.....

it's fine, the hub centre just helps roughly locate the wheel to the hub whenever the nuts are loose.
the tapered wheel nuts do most of the final alignment and the torqued nuts clamping the wheel against the face of the brake disc/hub keeps it all solid. perfectly smooth down the motorway.
 
And you've also just lost 8mm of thread from your wheel nuts Paul

Sent from my LG-H850 using Micra Sports Club mobile app

aye, the amount of thread engaged has gone back to the original 15-20mm with the oem studs and no-spacer, which holds on track so tis fine. if I knew I'd space em I would'nt have machined the last 10mm of new studs but meh. the rear studs are still poking out 5mm more (and that has the thinner rear discs, 8mm spacer) so maybe the rears are abit longer? I'll check and probably swap the front & rear studs around
 
You're probably well ahead of me but here's how project binky sorted thier bumpsteer. That's ok it's entertaining anyway...


yup that's pretty much what I'll be doing.
I watch all their shows too, it's soo good and ingenious and inspiring :)
waiting 2-3 months between episodes is soo long but worth it.
 
Last edited:
spare steering wheel arrived. was hoping the rubber was still bonded solid to the frame but afraid the top bit is still loose but the rest of the lower section is abit better. needs a good clean

IMAG6311.jpg
IMAG6312.jpg


yay the new female rose joints arrived

IMAG6310.jpg


for checking the bump steer alignment the laser level was clamped to the brake disc and the jack moves it up/down.

IMAG6315.jpg


but damn the rose joint is too short, even though this is the longest one I could find

IMAG6316.jpg


the oem tie-rod is twice as long

IMAG6317.jpg


without being able to find a longer rose joint, the solution for now is to extend the thread with the old one

IMAG6318.jpg


cut and machined the old tie-rod

IMAG6319.jpg


extension ready

IMAG6320.jpg


welded

IMAG6322.jpg


and now it can reach

IMAG6324.jpg


at full droop the rose joint fouls the hub

IMAG6325.jpg


grinded the obstruction

IMAG6326.jpg


and fitted 4.6mm spacers to provide clearances.
overall this has shifted the joint 47.6mm down from the original ball joint.

IMAG6327.jpg


to test the offset, I jack up the hub till it's at the static ride height, adjust the alignment till it's straight and then moved the strut through it's droop & bump stroke and plotted the amount of difference in wheel-toe.

added another 4.6mm spacer and retested the offset

IMAG6329.jpg


and here's the result

bump steer test.jpg


after just extending the lower ball joint and using OEM tie-rods, the blue line veers wayy off the scale with a huge amount of bump steer.

simply remounting the new joint underneath the hub has eliminated bump-steer.
adding an extra spacer upto 9.2mm actually made it worse.
so the closer it is to the hub, the less droop-steer there is.

according to the results if the tie-rod end was moved down 40mm from the original point (very difficult since the hub steering arm is in the way), the same amount as the lower ball joint was extended, it could achieve zero bump-steer.

just gotta finish the other side, neaten up all the assembly and that's bump-steer sorted :)
 
At full right lock, the tie-rod is parallel to the hub arm

IMAG6331.jpg


but the edge of the hub fouls the rose-joint during full-droop

IMAG6332.jpg


so I grinded the hub edge to provide better clearances

IMAG6333.jpg


Full right lock when drooped. notice this is swinging the rose-joint at it's angular limit

IMAG6334.jpg


Full left lock when drooped

IMAG6336.jpg


-- Bump steer during full lock --

Now lets check the bump steer during full lock.

When the inside wheel is fully drooped, it turns in slighter tighter. may help pull the front end during hard low-speed tight turns

IMAG6337.jpg


When the inside wheel is fully compressed, it turns abit less

IMAG6338.jpg


When the outside wheel is fully drooped, it's still straight

IMAG6339.jpg


When the outside wheel is fully compressed, it turns slightly less.
about the same amount as if the inside wheel was also fully compressed such as very hard braking at full lock.

but when the body leans over during cornering, the drooping inside wheel actually turns more to help the outside wheel.

IMAG6340.jpg


-- Finish Right Hand Suspension --

Fitted the rubber boot on the rose joint, which was kind of a tricky stretch, looks neat

IMAG6341.jpg


RH rose joint finally finished

IMAG6342.jpg


At full right lock & fully drooped, the steering tie-rod barely misses the chassis and the swaybar

IMAG6344.jpg


RH coilover cover is abit damaged so just wrapped it in ducktape for the moment

IMAG6345.jpg


And that's the ball joint extension & bump-steer corrected tie-rod ends finished on the right side :):cool::D

IMAG6347.jpg
IMAG6349.jpg


-- Finish LH Suspension --

Machined the LH rose joint

IMAG6352.jpg


it welded better than my first one

IMAG6356.jpg


booted up

IMAG6357.jpg


and installed

IMAG6358.jpg


-- Replace SRS Airbag Steering Wheel --

And now to replace my old worn steering wheel.
Notice on my preface 1998 system (right), the airbag controller is fitted inside the steering wheel.
whereas on the replacement 2001 facelift (left) the airbag controller will be fitted at the bottom of the dash console just in front of the ECU and the steering wheel has a blanking plate.

IMAG6360.jpg


The rubber grip on the preface old wheel has this slimmer profile to it whereas the facelift wheel has this beefy chunky full-round profile, which will change the ergonomic weight & feel of the steering

IMAG6361.jpg


Removing & swapping the airbag controller over

IMAG6362.jpg


The core structure of a steering wheel

IMAG6365.jpg


Here's another difference in the horn switch.

on the preface airbag wheel, the wire that goes to the airbag/horn controller box is riveted to the contact bracket.
on the facelift airbag wheel, there's just a spade connecter, similar to a preface non-airbag wheel.

IMAG6366.jpg


Wiped the wheel with carb cleaner to get rid of previous human slime :p

IMAG6367.jpg


-- Initial Test Drive --

Aligned the steering by eye in the dark night (got it pretty close but will correct the toe tomorrow) and very excitedly eager to get on with taking her for a test drive tonight.

Initially vigorously wiggled, shaked and yanked the steering around while during down the street to check everything is tight and solid.

Drove up to the usual countryside and motorway and Oh My Friggin Jezuz mighty Gawd kasandra's steering & handling is completely utterly transformed for the better :eek::D:D

The vague dead-zone in the middle is almost eliminated, I wiggle the steering and it immediately responds. if I wiggle at high-speed, the rear end feels very floppy & slow reacting from the full soft damper setting.

When I turn into a corner, Bang! her front end instantly shoots in that direction with zero delay
(the loaded up outer suspension arm would be perfectly horizontal and instantly ready to transfer lateral forces from the hub straight into the chassis rather than wasting time trying to roll the chassis & compress the springs in the old wrong geometry).

Throughout the corner she just keeps on turning very positively and stable with minimal understeer, even on some roundabouts and countryside bends where she used to struggle. no matter how much steering and speed I dared her to goto, she just turns and I can feel the soft rear end almost struggling to keep up.

Over straight & cornering bumps, she just always feels so calm & composed. corrected bump-steer working very nicely.

She feels amazingly perky & very lively :D
I'm gonna have to relearn her handling behavior, where her limit is and how much I can trust her :cool:
 
I'm really glad it worked out for you Paul, especially as few people have the guts or the nouse to mess with the suspension in such a way.
Wondering what the rear suspension needs to make it work now... Sounds a little like the rear roll centre needs raising as well but it might be difficult to achieve with a panhard rod, maybe a different mounting on the car, the roll centre is supposed to be near the centre of the panhard rod I think a higher mounting would raise that...
Anyway congratulations.


Certainly not for the faint hearted. It's too early to speculate conclusions. I've only just corrected the front geometry and had a very brief drove so my old setup of stiffening the rear sway etc goes out the window. I literally have to start from scratch.

The wiggly rear end is probably from the soft damper, hard rear swaybar setting and mostly the floppy T1R sidewalls.

I need to gather as much detailed factual data before making conclusions and plan actions.
 
How about a Watts linkage on the back end to stop the axle moving from side to side? Plenty of MKII Escorts have this conversion...

That'd be nice. Each type has their pros & cons but converting to watts is a major expensive undertaking challenge.
one to add to the long future todo list.

First thing is to gather real data from track testing before making conclusions.
 
That'd be nice. Each type has their pros & cons but converting to watts is a major expensive undertaking challenge.
one to add to the long future todo list.

First thing is to gather real data from track testing before making conclusions.
Agreed, but based off my limited reading on a watts linkage a chassis mounted linkage might raise the roll centre, it looks less complicated than what you've done with the front. I'm not sure how much room there is in there but apart from that... I reckon you might be able to use the panhard rod mounting on the axle, weld another on the other side and you're half way there...
 
Agreed, but based off my limited reading on a watts linkage a chassis mounted linkage might raise the roll centre, it looks less complicated than what you've done with the front. I'm not sure how much room there is in there but apart from that... I reckon you might be able to use the panhard rod mounting on the axle, weld another on the other side and you're half way there...

it's a major operation, requires alot of research & engineering factors to consider so it'll be on the back burner for awhile.
 
aligned the wheels with 1.2deg camber and 0.20deg toe-out.
wish the bloody irratic rain would go away cos everything is damp.

once sun came out, I tested the new alignment out in the damp countryside.


at normal speeds it corners nice, sharp & balanced with only a tiny understeer when the LSD locks.

@04:08 a little pheasant crossing the road :p

@4:45 I accelerate over that crested road and this time it remains straight & stable with the corrected bump-steer :cool:
 
spent all morning swapping x-brace, seats, track tyres.
abit tired prepping for tonights local trackday.

for those curious, this is the bare frame inside an airbag steering wheel after ripping the moulded rubber foam off. it's barely bonded onto the smooth round steel frame so no wonder the rubber slides around.

IMAG6373.jpg
 
I've heard of injecting superglue into them to stop it sliding about, haven't tried it but it can't hurt to try.

aye I tried that once and didn't work. it just could not spread evenly inside to bond the soft fluffy rubber foam to the hard slippery smooth round steel frame
 
aye I tried that once and didn't work. it just could not spread evenly inside to bond the soft fluffy rubber foam to the hard slippery smooth round steel frame
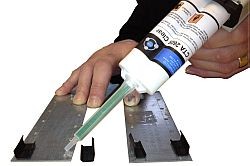
Cyanoacrylate adhesives rely on exposure to air to cure, injecting into a sealed area is just like putting it back in the bottle. A better solution would be to use a two part epoxy adhesive, with a mix nozzle like this:-
2-part-structural-adhesive-2105.jpg
 
Cyanoacrylate adhesives rely on exposure to air to cure, injecting into a sealed area is just like putting it back in the bottle. A better solution would be to use a two part epoxy adhesive, with a mix nozzle like this:-
2-part-structural-adhesive-2105.jpg

sweet, thx m8. I thought superglue cured via moisture?
 
sweet, thx m8. I thought superglue cured via moisture?
Yes, but the moisture in the air surrounding the joint is what does it, the small dry air pocket in the container or in your case the the very enclosed area inside the steering wheel grip, with only a very limited pocket of dry air would not allow curing to any degree.
 
Teesside Autodrome - Evening Trackday 09-06-17

Arrived at 4pm to sign in. Thankfully it's a blazing sunny evening, gr8 for the sticky tyres.

IMAG6376.jpg
IMAG6378.jpg


while registering, AJ aiken gave me a prod :p he arrived in his lowered facelift K11.

IMAG6379.jpg


We unpacked my equipment into his boot, I went to briefing while he registered and brought a helmet.
With this new suspension geometry I'll have to start over and begin with dampers at max, swaybars max and all cold tyre pressure to a high 2.6bars

Getting ready for the sighting lap is always a damn rush getting my cameras & helmet ready and barely made the back of the queue.

16.56 Warmup laps
Slowly warmed up the cold tyres & brakes and check the suspension mods are secure and feel ok


after the warm up, checked the warm tyre pressures back to 2.7bars and took Antony on track for a ride. Lets see how she feels

17.22 Session 1 with Antony
30/30 dampers
50/50 brake bias
95% fuel
2.7/2.7bars warm pressure


Lap times:
1:14 warming up
1:12 traffic
1:01 traffic

0:57
1:01 traffic
0:58
0:58
1:02 traffic
0:59

track_track_day.jpg


Remark:
- car feels balanced with a hint of understeer exiting sector 1 after the transitioning chicanes.
- the most noticable difference from raising the roll-center and fixing bump-steer is reduced understeer in low-speed tight corners especially the twisty bends uphill. the old setup used to always understeer badly but now it turns really sharp and sticks tightly to the apex.
- too much rear bias when braking hard for sector 3, so moved bias forward.
- good braking entry into the 180deg bend 5-6 but still understeers as the front tyres screaming and have to be patient.
- now with hot brakes, wheels & tyres, the front pressure has gone up to 2.95bar so reduced them back to 2.6/2.7bar front/rear to help the front tyres bite more on the fast bends

18:04 Session 2 with Antony
30/30 dampers
60/40 brake bias
90% fuel
2.6/2.7bars hot pressure


Lap times:
0:57
0:59 traffic
0:57
0:57
0:57 traffic
1:02 traffic
1:00 traffic
1:00 traffic
1:00 traffic


Remark:
- rear end locking up less often after moving brake bias forward
- softer front tyre pressure helped reduce high speed understeer slightly, such as the 180deg bend.
- gradually understeers more with each lap as the front wheels continue to get hotter causing the front pressure to build back up to 2.85/2.7bar front/rear
- Antony pulling off the passenger grab handle @ 09:02 during fast left turn lol

Dave & Nigel who I met during a recent car meet had arrived so gave Nigel a ride.
looking at the front tyre beginning to wear beyond the tread sides, 2.6bar maybe getting too soft for the heavy front end? so began to soften the front dampers instead to make the front end maintain contact more often than the rear end.

18:36 Session 3 with Nigel
20/30 dampers
60/40 brake bias
80% fuel
2.6/2.7bars hot pressure


Lap times:
0:56
0:56
0:57
1:00 traffic
1:00 traffic
0:59 traffic

Remark:
- softer front dampers certain made the front end turn-in better during the high-speed bumpy turn 1.
- overloaded the front tyre @ 03:15 with too much steering and lift-off understeer over the crest.
- green clio had the initial power down the straights but then lifted slightly and I was cautious if he was letting me pass or not, so had to overtake round the outside

19:00 Antony driving Kasandra
Antony said he registered as driver cos twas just an extra £10 and asked if he could have a drive?
I was initially uncertain & cautious, I don't often let someone drive my extreme & valuable car (you know the meme that says "can I ride ur wife?") but I trust in good spirit with a close eye that he'll treat her nicely and not grind her gears.

Driving on a busy track in a car he's never driven was abit risky so only allowed him go down the dual carriage way.


As any car guy will know, sitting passenger in ur own car when someone else is driving it for first time is always unsettling :p
yes as with anyone driving an unknown car with a light flywheel & heavy clutch he stalled few times up the steep congested pit lane but quickly adjusted :cool:

She sounds & feels quite different from the passenger side. There's a different whoosh noise. he drove her nicely (well done ant) and from a passenger pov suppose it's quite a thrill :D
 
Back at the pits I further softened the front dampers till 1/2 way to give more high speed oversteer and it was Daves turn for a ride.

19:44 Session 4 with Dave
15/30 dampers
60/40 brake bias
75% fuel
2.6/2.7bars hot pressure


Lap Times:
1:00 traffic
0:59 traffic
0:59 traffic
1:04 traffic
0:58 traffic
0:59 traffic
1:01 traffic
1:00 traffic
0:56 traffic

0:57
0:57
0:56
0:56

Remark:
- was a busy evening but soon cleared near the end
- Antony left his helmet behind my seat so it was thrown around abit
- @ 01:00 the soft front setting / stiff rear end definately nudges her handling over bumpy corners more towards oversteer. so she has a nervous rear end but is controllable, and yet at other times she's more neutral/understeer at that corner. maybe it's that dip in the corner.
- @ 5:30 had to drag race the BMW down the straights and brake deep into the 180deg corner :/
- @ 9:20 grey BMW exited too wide and had to drag race him down the straights
- @ 10:50 slight oversteer when going over that bumpy 1st corner
- @ 12:00 try abit of a braking flick to help turn into the tight bends
- @ 12:25 brakes are fading slightly for the 180deg bend

Thankfully nothing has broke, packed up my stuff and went home.
 
Teesside Trackday Analysis

My fastest lap time at Teesside Autodrome was 0:53sec in 2016-05-23 with no passenger and 50% fuel.
Yesterdays fastest time with the corrected roll-center & bump-steer was just 0:56sec with a passenger and 75% fuel.
For an equal comparison, the fastest time with a passenger before this suspension mod was 0:55sec in 2017-04-10.

Even though the setup ain't 100% perfected yet and the handling is starting to feel good, I've lost 1 second with the new mod :confused: so let's analyse where I'm losing time.

track_track_day.jpg

sector 1-2 tests how much speed can be carried through the fast exit.
sector 2-3 tests raw acceleration in 2nd gear.
sector 3-4 challenges the cars low speed handling with a series of tight and steep inclined chicanes.
sector 4-5 tests high speed acceleration.
sector 5-6 tests how rapid it can decelerate and it's maximum constant cornering speed.
sector 6-1 challenges the handling of the damper, spring & swaybar settings as the car weaves through the tight fast and very bumpy chicanes changing direction several times.

comparing my fastest passenger run from 2017-04-10 before the suspension mod with yesterdays fastest passenger run with modded geometry:
S 1-2: +0:52s carrying less speed through the transitioning 1st corner corner exit.
S 2-3: -0:36s better traction & braking.
S 3-4: -0:24s less understeer up the hilly chicane.
S 4-5: -0:04s the same acceleration.
S 5-6: -0:08s the same steady lateral grip from the 595RSR. Raised roll center had minimal effect.
S 6-1: +0:28s slower through the transitioning fast chicanes

It seems that I'm braking too early & too much for the 1st chicane corner at sector 1, coasting and carrying less speed through the series of bumpy sweeping bends during which the turbo can't accelerate the car any harder in 3rd gear.

Everywhere else, the geometry mod has made a big improvement.

Think I just gotta be abit more brave in that sweeping 1st section braking deeper and cornering right near the limit.
 
Last edited:
Yes, but the moisture in the air surrounding the joint is what does it, the small dry air pocket in the container or in your case the the very enclosed area inside the steering wheel grip, with only a very limited pocket of dry air would not allow curing to any degree.

yup true
 
the rose joint nylon lock nut was slightly loose so locked it with an extra nut

IMAG6381.jpg
IMAG6382.jpg


lower ball joint still tight

IMAG6383.jpg


front tyres look ok

fl tyre.jpg
fr  tyre.jpg


rear tyres are getting abit low & uneven

rl tyre.jpg
rr tyre.jpg


according to the records even after the geometry mod, the LH side of both front tyres wear more than the RH (cos most circuits are clockwise) at the same wear rate and both rear tyres continue to wear out the outer shoulders as the inside wheel always pops up & tilts the beam axle.

595 wear.jpg


front pads mostly fine

fl pad.jpg
fr pad.jpg


rear pads hardly wearing

rl pad.jpg
rr pad.jpg


front pads are 1/2 way there and the rear pads are only 1/4 worn

brake wear.jpg


changed the engine oil and awaiting a new bottle of LSD oil

IMAG6391.jpg
 
The inside rear seems to get it'self in the air a bit, did you say you were full hard on the anti-roll bars?

I remember reading that when dialling out understeer this person preferred focusing on getting the front to grip more rather than the back to grip less (ie. stiff rear ARB settings) and used the roll bars as the last resort to adjust the balance of the car.

Do you need more static camber at the front or more caster so you get more camber in turns when you need it? -1.75 is what I could find for camber.

yup I have whiteline front and rear swaybars (the non-heavy duty version), rears set at max stiffness to move the handling towards oversteer.

lifting the inside rear is inherantly common in fwd when trail braking with sticky tyres and soft spring rates and stiff rear swaybar. there's not much weight holding the rear end down (60/40% front/rear when static and maybe towards 75/25% during threshold braking) so no surprise the rear lifts up and the swaybar making the axle want to follow the rolling chassis.

my current method is max out all the dampers & tyres so that movement during transition is minimal, then soften the front end till understeer is reduced over steady / sweeping / bumpy corners.
raising the roll center helped alot in making the steering feel / turn tighter but now imo I really need to stiffen the spring rates to resist the amount of body movement.

front static camber currently maxed out at -1.2deg, could get more if I lengthen the lower arm.
 
Compare Suspension Before & After Geometry Correction

Analysing afew years of onboard footage at Teesside Autodrome, I can now compare the effects of changing the roll-center and different setups.
I've taken snapshots at these specific corners and analyse the amount of sidewall flex, body roll and steering angle.

turns.jpg


Turn 1

sidewall flex:
the softer 2.0bar front tyre pressure in the old setup made the tyre flex abit more than the 2.6bars in the new setup.
bodyroll: the new setup rolls slightly more, maybe cos I can turn harder without understeering.
steering angle: angle is roughly the same here.

t1 before-after mod.jpg


Turn 2

sidewall flex:
not much difference in tyre flex
bodyroll: the new setup rolls slightly more and inside wheel lifting higher, maybe cos I can turn harder without understeering.
steering angle: notice I'm steering less in the new setup and yet the outside wheel is at a sharper angle than the old setup? which may explain why it turns in better with less understeer.

t2 before-after mod.jpg


Turn 3

sidewall flex:
not much difference in tyre flex
bodyroll: the new setup rolls slightly more and inside wheel lifting higher, maybe cos I can turn harder without understeering.
steering angle: notice I'm steering the same in the new setup and yet the outside wheel is at a sharper angle than the old setup? which may explain why it turns in better with less understeer.

t3 before-after mod.jpg


Turn 4

sidewall flex:
not much difference in tyre flex
bodyroll: the new setup rolls slightly more and inside wheel lifting higher, maybe cos I can turn harder without understeering.
steering angle: notice I'm steering less in the new setup and yet the outside wheel is at a sharper angle than the old setup? which may explain why it turns in better with less understeer.

t4 before-after mod.jpg


Turn 5

sidewall flex:
the softer old setting flexes abit more than the new higher pressure during steady corner.
bodyroll: same amount of roll during steady turns
steering angle: Big difference here as I'm steering about 45deg less in the new setup for the same wheel angle at the slip angle limit?

t5 before-after mod.jpg


Turn 6

sidewall flex:
not much difference in tyre flex entering the corner
bodyroll: the new setup rolling slightly less
steering angle: notice I'm steering 90deg less in the new setup for the same wheel angle

t6 before-after mod.jpg


Turn 7

sidewall flex:
not much difference in tyre flex
bodyroll: same amount of roll
steering angle: notice I'm steering less in the new setup for the same wheel angle

t7 before-after mod.jpg


Conclusion
The biggest difference I can see after changing the roll-center and correcting bump-steer is that the outside wheel turns-in much sharper, which may explain why it felt more positive / less understeer / likes to turn in tighter. This tighter steering (front wheel alignment not fighting each other) increases lateral cornering forces and so it leans more on the soft springs.

The side walls only stiffened up very slightly when increased from 2.0 to 2.6bars.
 
Compare Suspension Setup Effects

With the same new suspension geometry, riding with a passenger, let's see what the car is doing between the initial max hard setting and the softer setting later that day.

turns.jpg


Turn 2
At the sharp hairpin with quick tight steering, notice that softening the front dampers while keeping the rear stiff allows the body to roll more during the turn, which influences the rear axle with stiff dampers to tilt up more

t2 hard-soft setup.jpg


Turn 3
At the winding uphill tight s-bends, we brake into a tight right turn immediately followed by a sudden uphill left turn.
The softer front dampening makes the body roll over more easily and the highly dampened & stiff rear axle swaybar couldn't tilt over fast enough which lifts the inside wheel earlier & higher.

t3 hard-soft setup.jpg


Turn 4
The steady tight right turn over a crest lifts the inside wheel the same amount

t4 hard-soft setup.jpg


Turn 5
During the steady long 180deg turn, the dampers have less work so the body roll & inside wheel remains the same

t5 hard-soft setup.jpg
 
When I fitted the new shorter open wheel nuts and added an 8mm spacer at the front wheels, the rear studs were too long and the front studs were too short

IMAG6148.jpg


so I removed the rear hub

IMAG6392.jpg


forgot to undo the front driveshaft nut and the hydraulic brakes were already off, but then I figured a neat trick of using a g-clamp to replicate the calipers

IMAG6395.jpg


the threadlock and nylon locknut on the ball joint extension bolt working really well to resist loosening off :D

IMAG6396.jpg


front hub removed

IMAG6397.jpg


the rear studs are 6.5mm longer than the fronts

IMAG6398.jpg


whacked the studs out

IMAG6399.jpg
IMAG6400.jpg


machined a longer spigot ring at the front hub to support the additional 8mm spacer

IMAG6402.jpg


cut a notch for removing the grease cap

IMAG6404.jpg


longer studs fitted to the front hub

IMAG6405.jpg


hubs reinstalled with 8mm spacers

IMAG6407.jpg


and now the studs fit perfectly with all the wheel spacers

IMAG6408.jpg
 
The inside rear seems to get it'self in the air a bit, did you say you were full hard on the anti-roll bars?

I remember reading that when dialling out understeer this person preferred focusing on getting the front to grip more rather than the back to grip less (ie. stiff rear ARB settings) and used the roll bars as the last resort to adjust the balance of the car.

Do you need more static camber at the front or more caster so you get more camber in turns when you need it? -1.75 is what I could find for camber.

Paul doesn't have adjustable caster up front, so is limited to what it came with from the factory. More caster does make a nice difference though.
 
Back
Top