• Please only use these forums for blogs, they are not a discussion forum

PollyMobiles Rebuild

the 25mm SS tube and silicone coupling arrived

DSC06025.JPG


tonight i took the gearbox off and wow i highly recommend making that balancing bracket fitted to the clutch bracket holes cos it made removal SOO easy.
I simply unbolted the box, rear & LH mount, slowly nudge the crane up to take slack until the box felt free n loose then simply slid it off the clutch, EASY:)

DSC06026.JPG


reveal the old clutch

DSC06027.JPG


heres the helix clutch. nothing abnormal. surfaces are very shiny

DSC06030.JPG
DSC06033.JPG


hints of overheated pads on the disc frame

DSC06031.JPG
DSC06032.JPG


few spots on the fly

DSC06029.JPG


really ate up the soft flywheel eh. more hints of overheating on that inner ridge

DSC06036.JPG
DSC06028.JPG
 
Last edited:
taking LSD out the gearbox

DSC06037.JPG
DSC06038.JPG
DSC06039.JPG


stuck the shafts in to test the lsd mechanism. there was alota slack in the ramp action
DSC06040.JPG


example gripper LSD diagram
http://www.davemacprops.com/dmpgriptechnical.html

Gripper%20diff%20diagrm1.gif


removing the allen bolts. they were locktighted on so taking care not to overstress em by unscrewing gently and when it gets slightly stiff i back off and try again

DSC06043.JPG


top cover off and to my horror it appears that the Belleville preload washer plate that preloads the clutchpack has absolutely obliterrated :eek:

DSC06044.JPG
DSC06046.JPG


top cover where the preload washer sits is abit pitted

DSC06047.JPG


side gear thrust washer

DSC06049.JPG


clearer pic of the destroyed preload washer, the thing just snaps in fingers easy

DSC06051.JPG


to keep it intact i stick it in some tape

DSC06052.JPG


remove the side gear

DSC06053.JPG
 
Last edited:
heres the clutch pack

DSC06055.JPG
DSC06056.JPG


outer plate 1 abit pitted from the shattered preload washer

DSC06058.JPG
DSC06059.JPG


inner plate 1, they all look normal n smooth with minimal wear nor any ridges

DSC06061.JPG
DSC06062.JPG


outer plate 2

DSC06063.JPG
DSC06064.JPG


inner plate 2

DSC06065.JPG
DSC06066.JPG


outer plate 3

DSC06067.JPG
DSC06068.JPG


inner plate 3

DSC06069.JPG
DSC06070.JPG


outer plate 4

DSC06071.JPG
DSC06072.JPG


inner plate 4

DSC06073.JPG
DSC06074.JPG
 
Last edited:
planet driver with the 45/45deg ramps

DSC06075.JPG
DSC06076.JPG
DSC06077.JPG


planet pinions

DSC06078.JPG
DSC06079.JPG


remove the other side gear

DSC06080.JPG
DSC06081.JPG


this is the blank planet driver ashtray that the wavy washer pushes the side gear against

DSC06082.JPG
DSC06083.JPG
DSC06084.JPG
DSC06085.JPG


DSC06086.JPG
DSC06087.JPG


how the ramps work

DSC06088.JPG
DSC06089.JPG


i retapped the allen threads n reassembled. gonna have to ring gripper bout fixing this

DSC06094.JPG

was reading into broken LSD belleville plates and came across this thread were john from gripper has replied to the guy at date 28-01-2011 and says since early 2011 they have a Lifetime Guarantee from any premature failure repaired free. i brought mine off matt in feb 2011, i wonder if my shattered preload plate issue counts as premature failure?

http://www.teamswift.net/viewtopic.php?f=4&t=47868&start=75
 
Last edited:
gr8 tips guys though i don't have a press so can't replace bushes n joints here unless i pay someone.
the front bush does seem to experience most of the enormous stresses while the rear one does tos all.
maybe they should be replaced by a smoother robust joint like PU bush to stainless tube insert or ball bearings or a rosejoint or thrust bearings to withstand the longitudinal forces?
anyway will see how the ebay arms work out for now

You don't need a press, I used a good vice and some choice sockets to press the bushed out with.

Yeah, we got PU bushes from Matt, but I HATE carbon steel for that and the cost of a bit of 316 bar stock and some time on the Colchester was well spent making up some proper stainless replacements. We did the same for the panhard rod and made up a supplementary bush insert which sits inside the main bush casing to help keep the end bush from twisting under load due to the reduced thread diameter. The zinc plated one which the Whiteline PHR comes with is not really fit for purpose.

Ebay arms should be ok, but like anything steel I would recommend a liberal coating in Boeshield T-9 prior to assembly.
 
You don't need a press, I used a good vice and some choice sockets to press the bushed out with.

Yeah, we got PU bushes from Matt, but I HATE carbon steel for that and the cost of a bit of 316 bar stock and some time on the Colchester was well spent making up some proper stainless replacements. We did the same for the panhard rod and made up a supplementary bush insert which sits inside the main bush casing to help keep the end bush from twisting under load due to the reduced thread diameter. The zinc plated one which the Whiteline PHR comes with is not really fit for purpose.

Ebay arms should be ok, but like anything steel I would recommend a liberal coating in Boeshield T-9 prior to assembly.​


i tried at one time whacking the old bush out the spare wishbone that came with the turbo kit and it was not budging unless i actually cut part of the surrounding metal off.

i just received me ebay wishbones and damn they have the rubbish front bushes that i can guarantee will fail under heavy track braking

DSC06097.JPG
DSC06095.JPG


maybe i'll jam a thick washer or tube into the gap between the arm frame & the chassis to reduce longitudinal movement?

or if matts available tomorrow i could drive by to fit some upgraded bushes then continue driving over to gripper in coventry to drop off the lsd?​
 
Last edited:
ok good news.
i rang john at gripper bout the broken lsd and he said the old brittler preload ring material used to break into many pieces like on my case but there was a redesign round 2011 where amonst many other refinements, the preload plate was made from a more ductile material that would just flex when overstressed rather than shatter. the lifetime warrenty was mainly for the 2011 updates but he said meh yea he'll do it for free :) plus i wanted to change to a 1.5way ramp and yea he'll do it free too :))
he's open till 12pm so i'll set off early tomorrow. technicians not in till tues but at least i'll get to discuss my requirements and get it delivered securely.

i also rang matt bout the wishbones. the ones pictured above from ebay are the stock normal ones but he can replace em with a 2-piece bush that'll fit snug between the arm & chassis for £28 each & vat. he's in all day tomorrow in his machine shop too so after seeing Gripper i'm popping over there to fit the bushes in his workshop and prob see his infamous dream warehouse :D
 
i just received me ebay wishbones and damn they have the rubbish front bushes that i can guarantee will fail under heavy track braking

Yeah, same here, those bushes failed 1 year later after install, lived with with for more 1 year, then decided to repair the good old Nissan ones...
 
Yeah, same here, those bushes failed 1 year later after install, lived with with for more 1 year, then decided to repair the good old Nissan ones...
least it's better than failing on the track right away. what happened, the PU edges just got chewed up by the braking?
 
i'm always wanted to make an inlet mani insulator after reading this
http://autospeed.com/cms/title_Cool-Stuff-Manifold-Insulators/A_110474/article.html

110474_2lo.jpg


this page takes bout making ur own
http://tech.mirage-performance.com/teflon-insulating-gasket.html

so i need some phenolic or teflon plastic sheet. ebay some PTFE sheets and found some 10mm teflon sheets from £5
http://www.ebay.co.uk/itm/10-mm-thi...t=LH_DefaultDomain_3&var=&hash=item92b05403d0

so get some teflon sheets, dremel match the holes and fit it between the spare manifold & forged piston engine block:)
 
what happened, the PU edges just got chewed up by the braking?

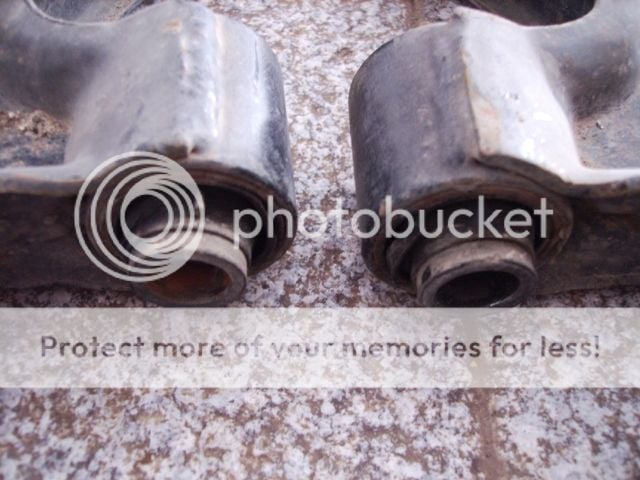
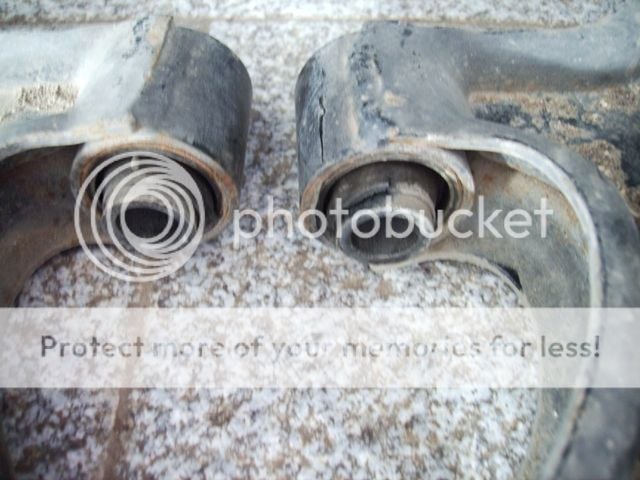
Not really chewed, but the PU was out of place, to the front. I started to notice it when braking, sort of a knocking noise, but then the car started to pull to one side when accelerating and to the other side on lift or braking...

And i dont do any trackdays atm, sometimes i just go to some kart track and have fun with the Micra (or have some street action too). Will try a trackday when the SR turbo is ready.
 
well i setted off at 7 tday, got to gripper at 11, john wasn't in so left it with the tech and john will call on monday for details.

went over to see matt, nice chap. i grabbed the wishbones n we headed straight upstairs to the sacred shelf of familiar micra rally bits to grab some poly bushes n also some heatwrap for the mani. i didn't get to see ur shell LR, we just went straight upstairs n straight out only seeing many shelves of bits

so bout £50 for poly bushes and £50 for infurno heatwrap. he said the front arm bush can't be pushed out, they're so tight fitted onto the casing. i'd have to cut out the stock bush n the poly ones slip right in

DSC06098.JPG


so back home lets destroy the bushes

DSC06099.JPG


drill straight through the bush all around then mole grip the insert and twist n rip the bugger out

DSC06100.JPG


carefully hacksaw two grooves through only the bush casing at 90degs to each other. don't cut too far into the actual wishbone metal

DSC06101.JPG


hammer the casing inwards with flathead to loosenm then tap it out

DSC06102.JPG


new poly bushes. i oiled it with engine oil cos it stays slippery longer

DSC06103.JPG


insert bush into arm

DSC06104.JPG


then push the insert in with a vice, don't use a hammer cos it won't fully seat

DSC06105.JPG


done

DSC06106.JPG
DSC06107.JPG


little defect in one arm

DSC06109.JPG
DSC06110.JPG


filed clear

DSC06111.JPG


old arms off

DSC06112.JPG


clearly see the braking force had pushed the arms through the soft rubber edge

DSC06113.JPG


new arms fitted

DSC06114.JPG
DSC06115.JPG
 
Last edited:
Not really chewed, but the PU was out of place, to the front. I started to notice it when braking, sort of a knocking noise, but then the car started to pull to one side when accelerating and to the other side on lift or braking...

And i dont do any trackdays atm, sometimes i just go to some kart track and have fun with the Micra (or have some street action too). Will try a trackday when the SR turbo is ready.

u have a pic of it? it shifted out? the bush looks pretty wedged between the chassis. but the end lips that fill the gap between the arms & chassis could do with being abit larger dia imo so the metal casing of the arm can't slip through under extreme braking.
 
u have a pic of it? it shifted out? the bush looks pretty wedged between the chassis. but the end lips that fill the gap between the arms & chassis could do with being abit larger dia imo so the metal casing of the arm can't slip through under extreme braking.

I will take some pics tomorrow if i have a chance.
 
fitted the RH hub

DSC06116.JPG


the coilover pillowballs are now real smooth. can turn em 360 and spray wd40 to flush n clean em. re-oiled

DSC06118.JPG


machined flywheel on

DSC06119.JPG


200mm clutch on

DSC06120.JPG


front swaybars abit rusty so just filed most of the crackly bubbly rust off, can't be bothered with wirebrushing, then just a lick of paint

DSC06121.JPG


took off the rear seat belts cos i figure they're prob the strongest points for anchoring an X-frame like this

DSC06122.JPG


a bonus is i'll also be able to keep the rear seats in too so can store stuff in boot out of view and keep out rear road noise too. but i think the seats'll be taking out when on track anyway

DSC06125.JPG


lower part bolted here

DSC06123.JPG


brackets made from the last bit of bar i have left. i'll only make the frame once the cars back on its feet cos its currently on axle stands and the garage is not flat n level which could affect chassis alignment

DSC06126.JPG
DSC06128.JPG


rear mounts getting slightly soft so to make a wedge i cut out a template from cardboard

DSC06129.JPG
DSC06130.JPG


made wedge outa wood which was easy

DSC06131.JPG


now its secure

DSC06133.JPG
 
Last edited:
ahh u were talkin bout the stock bushes. thought u were talking bout these new bushes from matt when u mentioned PU was outa place.
yea indeed the stock rubber front bushes r rubbish for any prolonged spirited driving

ordered some 6mm PTFE sheet for the inlet mani insulator for £17
http://www.ebay.co.uk/itm/ws/eBayISAPI.dll?ViewItem&item=360423059799&ssPageName=ADME:L:OC:GB:1123

$%28KGrHqRHJBQE7%29zgtuDbBP%21ifeJgKg%7E%7E60_12.JPG


read on a honda forum that one guys teflon gasket melted. ptfe melts at 260C i wonder how hot the cg13de inlet port gets. when i'm at oulton i'll have to measure how hot the inlet port of the engine head gets after few laps.
 
ahh u were talkin bout the stock bushes. thought u were talking bout these new bushes from matt when u mentioned PU was outa place.
yea indeed the stock rubber front bushes r rubbish for any prolonged spirited driving

Hmm.. i get the feeling they could be the cause of my car's occasional deviations then... I'm quite fond of spirited driving and im still running the 16yr old originals i think :s

How easy is it to swap those over? Considering i dont have a garage could it be done inside a day?
 
Hmm.. i get the feeling they could be the cause of my car's occasional deviations then... I'm quite fond of spirited driving and im still running the 16yr old originals i think :s

How easy is it to swap those over? Considering i dont have a garage could it be done inside a day?

replacing lower arms few mins.
-jack up on stands
-wheel off
-i apply brakes by jamming the jack handle between seat & brake pedal. or ask a helper
-remove the driveshaft nut
-release brake pedal
-remove caliper from carrier, hang it up with ziptie
-unclip brake hose from strut
-unbolt hub from strut
-move hub outwards and slip the shaft out
-reconnect the hub to strut, no need to fit the nuts
-remove balljoint splitpin and really clean n wirebrush as much rust off the exposed thread & nut
-jack under the balljoint to prevent the tapered balljoint shaft from spinning
-undo the nut, preferably with a short 6 sided socket on a ratchet. while unscrewing if it feels stiff at any point, back off, wirebrush, reoil and try again
-remove jack
-separate hub from joint with the scissor type seperator tool. avoid those wedge hammer tools, wrecks rubber covers
-unbolt swaybar from arm
-unbolt arm from chassis
-replace arm
-bolt up the front/rear mount, swaybar
-finger tighten the balljoint nut then jack up the joint to apply holding pressure then tighten to spec with new splitpin
-unbolt the hub from strut and pull hub outwards to fit the driveshaft
-refit the hub/strut nut bolt, caliper, driveshaft nut upto spec with new splitpin

Cheers for that :) looks like im gonna need some help when i get round to this... *calls dad*
 
thinking bout the oil catch i needed some form of sheet mesh filter to spiral inside the can between sheets of thin plastic sheet like projector sheets.

thought what bout those 10mm thick packaging foam sheets u get when u buy new pc motherboards, but foam will prob breakup in to bits n into the turbo/engine

then dad said how bout those grease filter panels we used to have in kitchen, they're stainless. but they're at least £17 each

$(KGrHqJ,!j!E5duZJtq)BOgs3yJ,-Q~~60_3.JPG


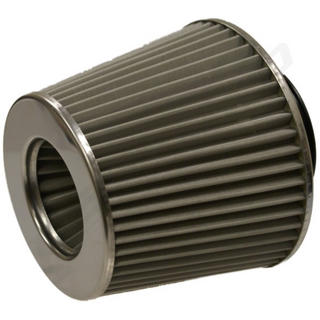
then thought what bout those stainless mesh cone air filters, its already corregated for me to just spiral wrap. but then thought having the air/oil enter across the long line of filter via a small cross area, the filter itself would extract the oil but mainly at where the flow first meets the filter which could then block up full of oil cos the fine mesh doesn't allow it to drop down the can easily.

so what if i use the round mesh filters as normal with the mixture flowing through the filter utilising the large available surface area. oil collects on the stainless filter element and trickle down into the can container base.

medAir004%201.jpg

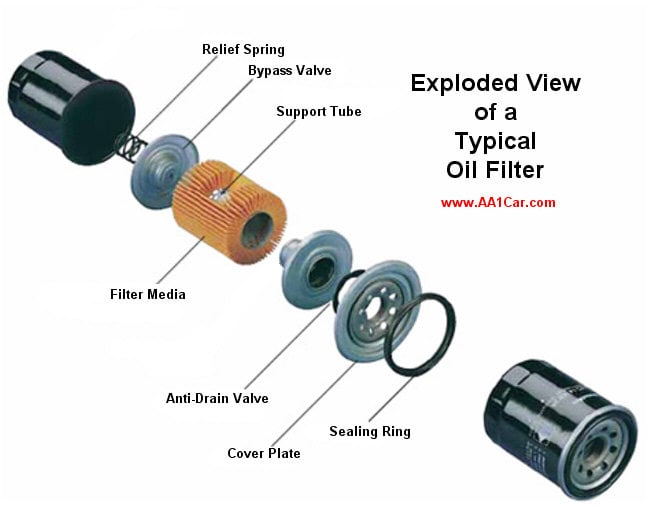
but then looking at pics of mesh filters i realised hang on, instead of spending all this effect making the container n making the filter fit etc, how bout if i use an oil filter as a ready made air/oil separator filter?
oil_filter_exploded_view.jpg


so i either buy a remote oil filter head £22 so the ports are connected to the breather pipes
http://www.jjcraceandrally.com/Product.do?method=view&n=2356&p=226375&utm_source=Google&utm_medium=Base&utm_campaign=Sandwich Plates

%21BS6SyV%21%212k%7E$%28KGrHgoH-CYEjlLl9odTBKFo%21gSQw%21%7E%7E_12.JPG


or i make one by cutting off the oil filter screw thread from the original forged engine block (since the wrongly machined block will never be used) using it as the outlet port, weld it through a flat plate (like the scrap stainless saw blade wheel i broke) so it seals against the oil filter seal ring, then weld an inlet port onto the plate beside the center outlet screw thread.

maybe i should try the diy version first to check it'll work before investing £22 for the remote filter header

should be quick n easy to check if its full and replace

thoughts?
 
looking on ebay i found this oil filter mount for a norton commando motorbike for £24

437931069_o.jpg


the filters are £8

!BrMY9g!!Wk~$(KGrHqYOKi!Eu3T453l4BLytvyHoG!~~_12.JPG


but then someones selling the combo for £26

pa040228.jpg
 
Last edited:
I'm sure if you go for the combo, the filter it comes with will be available from Halfords anyway so you may as well go for the combo and avoid any potential hassle :).
 
I'm sure if you go for the combo, the filter it comes with will be available from Halfords anyway so you may as well go for the combo and avoid any potential hassle :).

yep tis why i brought the combo. the filter itself is £8 on ebay when it needs changin
 
got the ptfe sheet. tis like those white slippery plastic choppin board stuff

putting a lighter on it hardly melts or burns and when putting my finger agains the other side of the flame it kept cool for quite awhile. its only after bout 30secs later that the continuous 1000C heat energy of the naked flame managed to reach the other side and very slowly warm it up

DSC06137.JPG


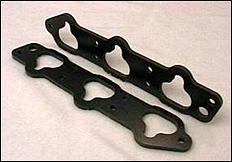
made a gasket template on the manifold with tape

DSC06138.JPG


transfer onto ptfe

DSC06139.JPG


roughly cut into shape. ptfe is a high temp self lubing plastic so none of the friction cutting stuff works, needs a more aggressive chopping slicing action. a junior hacksaw works well then i modified a dremel wood cutting disc to be more serrated and it chops through it no probs but i'm covered in teflon bits now

DSC06140.JPG


bolted onto manifold to finish matching the bore hole

DSC06141.JPG
DSC06142.JPG


did the other gasket

DSC06143.JPG


finished set of teflon insulators

DSC06144.JPG


fitted onto the block. will need to use slightly longer bolts

DSC06145.JPG
DSC06146.JPG
 
Last edited:
hubs ready tday so will pick up later

john from gripper phoned up bout the diff:
-they'll replace the shattered old preload spring with the improved version,
-the pitted diff cover & plate that rested on the shattered ring don't need replacing cos they just rest static,
-the ramp will be changed from 2-way to 1.5 way,
-the preload of a new lsd is usually bout 50ftlb then once the plates are bedded in it reduces down to 30-40ftlb, he will set my already bedded lsd at 30ftlb cos higher initial preload will worsen the next pointer below,
-he told me that these speedo version LSD tends to wind themselves up harder during right turns due to their uneven one-sided config, remember my last video where turning the RH shaft would lock the diff easier than the LH shaft, which could explain why it chattered more on right turns than left turns, and more preload from street use makes this behavior worse.
the normal full width LSD don't have this issue cos the clutch on both sides of the pinion gears balance each other out.

will be ready tonight n shipped tomorrow, i'll only have to pay £25 for the new ramp and £15 for post
 
was working late so forgot to get the hub

thinking i'll need to create a lip on the ends of the IC pipe and was looking for some 2mm dia SS rods but then realised i could just use the SS welding rods themselves. the 63mm pipe is 200mm circumference and welding rods 300mm. i crack off the coating, bend the rod round pipe and tack in place

Ordered some black diamond fast track front pads for when i use up the Red stuff after next few tracks
 
oh what a crap day.

work is a headache

gripper called me bout payment. lady said £25 for new ramp, ok, £15 delivery, ok, and £65 for rebuild, WTF?
i thought they'd replace that spring free and the other plates were fine? passed over to john and he said its an all inclusive charge (or labour charge basically cos they can't earn from the small £3 plates) oh ffs great I guess my LSD was NOT under warranty and they don't repair my broken diff for free, here have my friggin money :mad: will be here tomorrow but i'm not happy

but on upside i picked up the hub with new bearing and was just £30 (was £50 last time)

my bday is in april and thought i'd fancy karting with m8s then upon checking at local teesside autodrome they have an open pit trackday on the day for £99 Plus at 3.30 u get 30min karting included in price:)
well thats my idea of a good bday sorted, trackday in micra from 8-3.30pm, karting with m8s till 4pm then back home for a nice meal
 
re your catchcan paul, are you getting some excess crankcase pressure then ? mine has a lot less than i was expecting


dunno maybe little. the oil vapours from the breather certainly builds up on the pipe going to the catch and on the old IC pipe. hopefully this oil filter catch can will sort it all
 
got hub with new bearing

DSC06148.JPG


fitted

DSC06149.JPG
DSC06150.JPG


i'm thinking i'll also try fit the teflon manifold spacers too
 
Last edited:
be glad to when i'm free. will be very busy next few weeks cos of trackdays and fitting the new engine but will let u know when i have space.
what ya need help on? doing minor stuff or a checking over i could pop over to do but major stuff that could require bit of powertools or handwork will have to do at my place
 
the remote oil filter came, really small

DSC06151.JPG


the pipes are 10mm dia but 19mm apart. getting the 16mm ID piping to fit will be very tight unless i machine it a little

DSC06152.JPG
DSC06155.JPG


tiny oil filter

DSC06153.JPG
DSC06154.JPG


blowing through the pipes either way it flows real easy so the antidrain valve is not too intrusive at the mo
 
Last edited:
just got back the rebuilt LSD:) will take pics back home. think i'll take it apart again to double check the changes, measure the plate thicknesses (so next rebuild i'll just order the plates and rebuild it myself to take out their labour charges) and reapply threadlock. now i can begin reassembly over the weekend
 
On the note of calling in... is hull too far to come? I dont know any mechanics up here, not sure exactly where u are though so might be well off the mark! My car could use a look over i think... (and a wash but i can do that bit myself haha :) )

Actually while im asking.. how do u check the oil level in the gearbox? Or top it up if some is missing? I think ive lost my haynes bible :(

I'm in hartlepool which is quite far, unless ya wanna drive up here for a checkup

I remove the speedo and check the level is enough to submerge the speedo gear
 
Back
Top