• Please only use these forums for blogs, they are not a discussion forum

Bens K10. The Second Micra

A little update on the Micra. Pretty much nothing has happened. I did however lend an engine hoist off my mate and started getting the clutch off. Before i drop the old engine out i do want to get the bay steam cleaned while it's drive able. Also getting some really bad clutch slip, more so than usual, but that's not actually a problem as i've got a new one to put in anyway haha.
 
Now I wanted to update my blog mainly because of what i've just won in the auctions. I've decided to get a set of wheels imported directly from Japan!! Couldn't find any i liked over here and thought i'd go for it.

http://page3.auctions.yahoo.co.jp/jp/auction/c530337996#enlargeimg

My importer won the auction for me for 16000 Yen or roughly £86! But now i'll have to pay shipping fee's, inport fee's ect.. so it's going to work out a tad more expensive than that, but hey, i'll probably be the only Micra in Europe to be running a set! :D
 
Little update. Wheels have been posted from Japan!! Should be with me in the next few weeks. Total cost of wheels (so far) £425...
They better be worth it :L
 
Flipping heck that was quick! Found out yesterday that my wheels have landed in the UK :D
Going to have a look at them tomorrow and then they are getting a refurb :)
12182469_1629320740656687_3370563458470268483_o.jpg
 
Picking my newly refurb'd SSR wheels up Friday!! So excited :)

Ohh and i also managed to find myself a complete black 1L Super S interior! :D Picking that up Sunday, no more brown/grey for me!!
11216700_912739808802227_8614446179965231897_n.jpg

12241367_912739785468896_6353847051380634208_n.jpg

Sorry about the pics, it's from the blokes advert. I do feel bad for stripping a 1L Super S (actually just super) but it'll get to live on in my little Micra at least
 
Last edited:
Hopefully i should be able to get something together. I've pretty much got all the parts it's just getting em to work haha
Saying that i still need a 4-2-1 manifold for the CG13 and an AFR sensor and guage as that should help loads with setting me carbs up!
 
Finally at long last i've managed to get everything sorted so i can start my engine swap that I've been on about it for most of the year lol. Anyway.

IMAG1248 (Large).jpg

Little Micra tucked away in a very cramped and damp garage, a lot better than nothing i guess haha.

IMAG1249 (Large).jpg
My CG13 ready and waiting to go. I will be cleaning and painting this at some point but for now i just want to get it in the Micra

IMAG1251 (Large).jpg
Bonnet, grille and bumper off for better access. Top tip if you ever want to take the bonnet off on your own, if you take the grille off you can get to the bolts from underneath :)

IMAG1252 (Large).jpg
Headlights out and took the rad out, such a tiny little thing but it does a good job!

IMAG1253 (Large).jpg
Not as much coolant as i was expecting to come out but it seems in ok condition apart from all the orange bits in it.

IMAG1256 (Large).jpg
The little K10 rad, in really good nick so hopefully i can use it with the CG13

IMAG1257 (Large).jpg
Manage to get the centre caps off, don't think they had ever been off in the cars life, when i got under there the split pins still had the yellow inspection paint on from the factory!! (pic after a took it off lol)

IMAG1260 (Large).jpg

Driveshafts did not want to come out of the gearbox but got them out eventually, and that oil is most likely the original oil from when it was new!
(and not as much of it as i was expecting but never mind, some good quality stuff will be going back in :) )

IMAG1263 (Large).jpg
Pretty much everything out just trying to find someway of getting the rope around the engine.

IMAG1265 (Large).jpg
Almost there! It got dark so i had to give up, but hopefully i can get it out by the end of this week :)
 

Attachments

  • IMAG1250 (Large).jpg
    IMAG1250 (Large).jpg
    88.6 KB · Views: 372
  • IMAG1258 (Large).jpg
    IMAG1258 (Large).jpg
    306 KB · Views: 368
  • IMAG1264 (Large).jpg
    IMAG1264 (Large).jpg
    282.2 KB · Views: 366
Fair play, reminds me of when I done mine on my own.

Picked up engine in the Morning, drove 200 miles, then worked into the night fitting it

Good stuff


Sent from my iPhone using Tapatalk
 
@pork. I'm gonna need your help with soon. I'm not really sure what i need to be doing with the K10 dizzy. I know i need to chop the K11 one up and adapt it to the K10 but apart from that i'm a bit stuck.

Any suggestions would be greatly appreciated :)
 
Well onto week 2 of the engine swap, today i did manage to get the engine out and get the gearbox off, surprisingly the gearbox came off pretty easily, i thought it might have got seized on.
So now that the engine is out, tomorrow i am going to bolt the gearbox to the CG13 (without flywheel or clutch) so i can get it in the engine bay and take measurements for the drivers side engine mount as i need to make a plate up to join the engine to the mount.
Also i will be remaking a gearbox mount in work as the rubber has perished completely (i'll get a pic tomorrow) and the metal bush inside has actually cracked! Good thing is in work we have lots of polyurethane and a lathe so i should be able to sort something! :)

On to the pics
12358189_929018487145233_800554494_n.jpg
Engine pretty much out, was a bit tricky as both my 14mm sockets had rounded off (suppose thats what i get for buying a set off ebay)

12355147_929018467145235_578909488_n.jpg

At this point my mate Mat came down to help and brought be a 14mm socket so work could continue!

12355155_929018453811903_1041580862_n.jpg
Engine out!! No turning back now i guess

12380073_929018443811904_1474397744_n.jpg
Gearbox off! Came off really easily and it pretty good condition. Does need a good clean though

12355144_929018440478571_1978330331_n.jpg

Little MA10 with it's tiny 160mm clutch, box has never been off and it was an original Nissan clutch!!

12355113_929018393811909_714508597_n.jpg
I do actually feel a bit bad for doing this as nothing had ever been moved in the engine bay and there is nothing actually wrong with the MA10, but I've allways wanted to do something like this and a K10 is a good place to start, i mean look at the size of that engine bay!!

12380231_929018403811908_256962840_n.jpg
Another pic of the engine and box, excuse the dodgy strapping on the engine, it's not the best but does the job

12358148_929018383811910_1324831178_n.jpg
And finally a picture of the 180mm clutch that came off my CG13 and my 160mm that came of the the MA10. Quite a size difference, TBH i would love to run the 180mm clutch but it's not possible with the MA10 gearbox. So we'll see how well the 160 will hold up!

Well that's all for now, should have an update sometime tomorrow :)
 

Attachments

  • 12357938_929018370478578_400357730_n.jpg
    12357938_929018370478578_400357730_n.jpg
    152.3 KB · Views: 373
  • 12357974_929018457145236_207969670_n.jpg
    12357974_929018457145236_207969670_n.jpg
    96.9 KB · Views: 367
  • 12357974_929018483811900_413543224_n.jpg
    12357974_929018483811900_413543224_n.jpg
    87.4 KB · Views: 365
  • 12358330_929018460478569_736029208_n.jpg
    12358330_929018460478569_736029208_n.jpg
    76.9 KB · Views: 372
  • 12358405_929018493811899_1438888628_n.jpg
    12358405_929018493811899_1438888628_n.jpg
    90.7 KB · Views: 353
  • 12358407_929018413811907_1169140471_n.jpg
    12358407_929018413811907_1169140471_n.jpg
    117.1 KB · Views: 352
  • 12369468_929006443813104_1139811055_o.jpg
    12369468_929006443813104_1139811055_o.jpg
    295.8 KB · Views: 345
  • 12388237_929018447145237_451566748_n.jpg
    12388237_929018447145237_451566748_n.jpg
    94.8 KB · Views: 368
Bit late on the update sorry!
Anyway. I was hoping to get the CG13 and MA10 box bolted together and in the car ready to measure up the engine mount but unfortunately the bolts holding the gearbox to the engine are bigger on a CG than the MA (M8 for MA and M10 for CG). Bugger, but it's only a small problem as i just need the bigger bolts. So all i did Sunday was line the box up with the engine and amazingly it lines up perfectly :D I had the engine like that as it was easier to line the box up lol.
IMAG1282 (Large).jpg

I did however find a few mounts that needed some attention so i took them with me to mess around with in work.

IMAG1286 (Large).jpg
This is a little mount that bolts up to the engine by the gearbox, only needed the top hole elongated so it would bolt up nicely onto the CG :)

IMAG1287 (Large).jpg
I nicely remade bush made out of polyurethane :D My old one disentergrated in my hands and since i have quite a bit of this stuff lying around in work i thought it was worth a go. Also this is the mount that goes onto that little bracket i modified. helps stop the engine from rocking side to side.

IMAG1288 (Large).jpg
This is my lower gearbox mount, it is the mount that does most of the hard work in stopping the engine from moving too much under acceleration. As most K10 owners will know this mount fails and leaves the engine free to rock around quite a bit. Now the plan was to remake a solid poly bush but the old bush had other idea's and did not want to move. So as a small bodge i stuffed it with chucks of poly. They are in there pretty tight i used a hefty vice to get them in, so it's pretty solid now which is nice. I will however try and remake this in the future if i have a little more time for it.

Well that's it for now. Hopefully on the weekend i can get the engine and box in. So i can take measurements and make a template for my engine mount! Then i can take the engine back out fit the CG10 flywheel and clutch and stick the engine back in there properly over Christmas. I've got my fingers crossed :L
 

Attachments

  • IMAG1285 (Large).jpg
    IMAG1285 (Large).jpg
    185.3 KB · Views: 346
Got all the right bolts and stuff today so i got the engine and gearbox together and did have them in the engine bay, unfortunately the little mount i made so i could wrap the rope around for the hoist was getting in the way so i had to give up and leave it. I did get my modded mounts in so hopefully i'll be able to get my engine in tomorrow and get the measurements for my engine mount :)

Only got the one picture sorry as i had my hands full with the engine and was getting annoyed at why it was not fitting :L
IMAG1291 (Large).jpg
 
Last edited:
Well this is a very delayed update, but better late then never i guess! I think this is from 18/19th December.

So after taking off the mount i made, this gave me enough room to pick my engine up and get it lined up in the car. I had to tie the rope around the bolts that hold the drivers side engine mount. Not the best but it worked.
12400256_933084216738660_1204881933_o.jpg
Engine in place with the two gearbox mounts bolted in and the engine is looking a bit close to the chassis rail. Hmmm

12413977_933084230071992_502118877_o.jpg
Yeah not the best pretty the bottom pulley is pretty much touching the chassis rail. So me and my friend had an idea which i guess is a little bit of a bodge to move the engine over slightly.

12399785_933084260071989_220564334_o.jpg
The Idea was to oval the holes on the main gearbox mount ever so slightly to shift the engine over. This actually worked quite well and shifted the engine over by a one or two CM, not much but just enough room to clear the chassis rail.

12399008_933084183405330_554889619_n.jpg

Yes! Success, engine has moved over just enough so the bottom pulley no longer fowls on the chassis rail, Hopefully doing this won't mess up the gear linkages as i've not checked to see if they bolt up. Fingers crossed i guess.

12413958_933084303405318_1222908573_o.jpg
I managed to get this far and now the engine needs to come back out so i can attach my new CG10 flywheel and clutch. I just wanted to get the engine in there to test fit it too see if i ran into any problems.

Hopefully i can get some time on new years day to give it ago :)

Well i'll be back when i next do something to the Micra but i am actually getting somewhere. However i do have a very long list of things that still need to be done!
Getting the engine in is the easy part!

Anyway Happy New Year Micra lovers and all the best for the new year!
My deadline for getting the Micra up and running is Japfest 2016 so i've only got a few months left to go!
 

Attachments

  • 12414089_933084293405319_415269880_o.jpg
    12414089_933084293405319_415269880_o.jpg
    299.2 KB · Views: 355
I've just on the view counter that it's clicked over to 2500 views!!! I might actually be doing something right then haha
Thanks everyone for taking a look :)
 
Finally built up the effort to start work on the Micra today. First thing was to get the engine back out so i could fit my new clutch and CG10 flywheel. Then my 1/2 inch ratchet broke, well i say broke it's just sized up solid and won't click. So i had to go to Halfords and pay £25 for a new one... At the very least it's pretty decent quality.

DSCF3172 (Large).JPG
Brought one of my wheels along with me to get an idea of how they would fit. I made sure it was well secured for it's journey!

DSCF3173 (Large).JPG
Looking good! Only a rough idea of the kind of fitment as they are 4x114.3 so i could only balance it on one stud.

DSCF3174 (Large).JPG
Hmm dat poke! I like it :)

DSCF3175 (Large).JPG
Cannot wait to get these wheels on, even in a leaky garage and on a half disassembled Micra they look good haha

IMAG1305 (Large).jpg
Well onto what i actually came up to do. After buying my new ratchet i got the engine out, quite happy as i managed to do it myself which is actually quite difficult because the ground is so uneven the crane needs to be picked up in certain places.

IMAG1306 (Large).jpg
Don't know if that was a good or bad idea picking it up by the crank pulley. Should be fine after all it's not a heavy engine and it was only for around 10 mins, worked pretty well though.

IMAG1307 (Large).jpg

Empty engine bay.. again, i would have got rid of that downpipe by now but i can't get enough leverage on the very rusty bolts underneath the car and i can't get an angle grinder on it. :(

IMAG1308 (Large).jpg

Engine and gearbox split again. So i can start assembling it properly :)

IMAG1309 (Large).jpg
The little MA10 4-speed. Will give the inside a little clean before putting back on, outside can wait till the summer.

IMAG1311 (Large).jpg
The CG13 with the backing plate and cleaned CG10 flywheel, it's in ok condition the surface that the clutch rubs against is a little rough, guess thats down to lots of clutch slipping (apparently it came off of a 46K mile CG10)

IMAG1312 (Large).jpg
Slightly better close up, best i could do with cleaning it up.

IMAG1314 (Large).jpg
New clutch on, unfortunately it started raining so it got a little wet :(

IMAG1315 (Large).jpg

Trying to show the difference between my old clutch on the MA10 vs the new clutch. There was a noticeable difference in thickness which is'nt the best considering it had only done 49K

IMAG1319 (Large).jpg
And where i left it when it got too dark to carry on. The lockup is an absolute heap atm can't wait to get the car rolling and clean it out a bit, plus it's wetter in there than it is outside which is not doing the Micra alot of good :(

Well since i'm back in work tomorrow i won't be able to do anything now until the weekends unless i can get a power source and a good light. Sigh....
 

Attachments

  • IMAG1310 (Large).jpg
    IMAG1310 (Large).jpg
    269.6 KB · Views: 366
Had a little play with my K11 distributor after work today to see if i could get it apart. It proved much easier than i had thought actually. Now i'm just trying to figure out how to best cut it up so i can use it to mount my MA10 distributor to the CG :/
DSCF3185 (Large).JPG
I ended up using more tools than i thought though haha. Yes the mallet and impact driver were necessary for some stuck screws!

DSCF3186 (Large).JPG
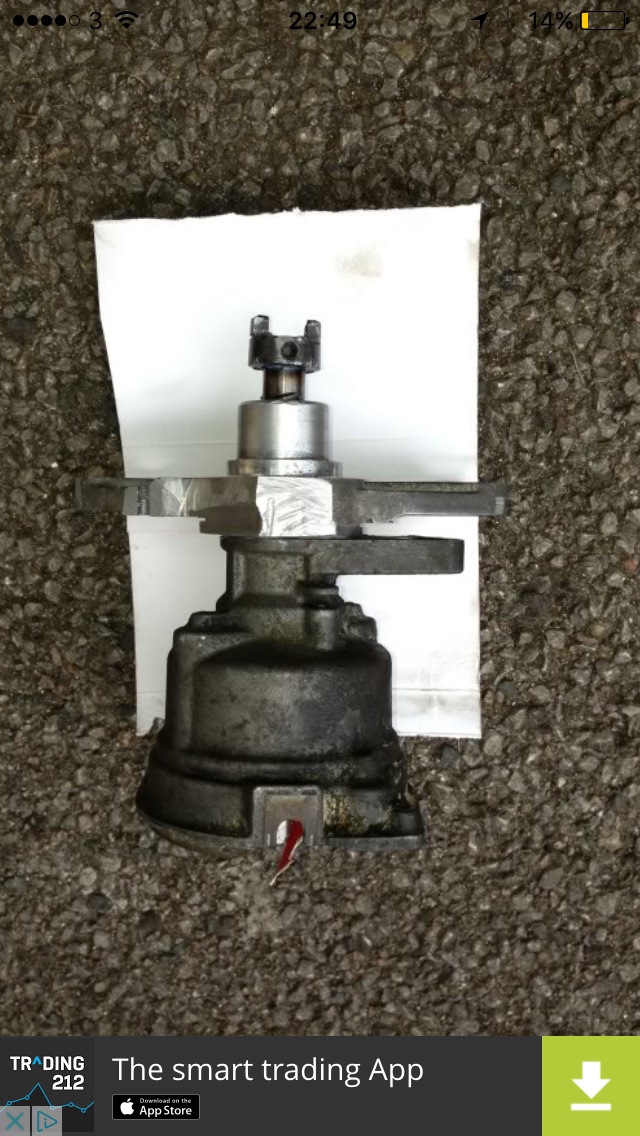
Stripped down to the parts i need, main body. bearing and the main shaft with slotted drive thingy attached.
 
Little late on the update bit here is the latest progress from the weekend.

So on the Saturday i got my engine and gearbox back together again but this time with a clutch and flywheel :) Everything lined up nicely and didn't have too much trouble lining up the input shaft to the clutch. Also gave the inside of the gearbox a clean to remove all the clutch dust.

IMAG1325 (Large).jpg
No pics of me cleaning up the gearbox or getting the clutch on (i got a bit carried away). So you'll just have to take my word that the engine and box is now together properly :)

IMAG1326 (Large).jpg
I've been thinking about what i can do about the drivers side engine mount for around a month or so, coming up with many different idea's each one getting simpler than the last (which is good :) ). So this is how the CG mount normally looks...

IMAG1327 (Large).jpg
But i chopped the part in the middle out so i could use it for my new super simple engine mount!

IMAG1328 (Large).jpg
Pretty good job considering i did it with a blunt Jr hacksaw in the rain :L

IMAG1330 (Large).jpg
So this is how the engine and box is. MA mount on the left and CG mount on the right. Plan is to chop the MA mount up and weld a piece of plate onto it so i can run it over to the CG mount and can bolt it up. I'm currently doing that in work at the moment, along with some distributor mods and a few intake manifold mods. Will get some pics of those in the next couple of days :)
 

Attachments

  • IMAG1329 (Large).jpg
    IMAG1329 (Large).jpg
    67.7 KB · Views: 332
  • IMAG1332 (Large).jpg
    IMAG1332 (Large).jpg
    345.2 KB · Views: 342
So i start off Sunday with the engine just about in place on the two gearbox mounts. I've decided it's not coming out again so i decided to start connecting stuff back up again :)
DSCF3191 (Large).JPG
Engine still being held up by the trusty engine hoist very kindly lent off my friend Jordan :) Hopefully he doesn't mind it being covered in wet cardboard and gearbox oil when i give it back to him haha

DSCF3192 (Large).JPG
Passenger driveshaft back in! Well on the gearbox anyway

DSCF3193 (Large).JPG
Also back on the hub too! I feel like i am starting to get somewhere now :)

DSCF3194 (Large).JPG
Both driveshafts back in now! I've still got a lot of pipes and wires to sort out but i think i know what most of them are and where to put them hahah

DSCF3195 (Large).JPG
Another pic of my engine mount problems, hopefully that'll be sorted soon

DSCF3196 (Large).JPG
Well this is how i finished the day, but i lot more things have now been connected back up including some of the wiring. I did put the battery back on to see if it would turn over on the starter but nothing happened. So fingers crossed it's because i don't have everything wired up yet.

Been a bit of a rubbish update to be honest but next weeks will be good! (well hopefully if i can get everything i need finished in work haha)
 
Coming along nicely

What I did with mine was drill out the old k10 body mount

Then made a new mount out of thick steel, then welded it to the body, this way you keep the cg mouny


Sent from my iPhone using Tapatalk
 
Just found this pic of my old dizzy ,

The brighter silver part is what's left of the chopped up k11 dizzy housing, all that remains are the bolt hole parts, i then drilled it out so it would fit over the k10 dizzy

So it's like a collar

Then welded on the k11 drive to the k10 dizzy,

824acad0ca0741fbeb37d6590d083967.jpg


Sent from my iPhone using Tapatalk
 
Well after a big lapse in updates i'm back! The main lack of updates is due mainly to me loosing my job :( but no worries i've pretty much collected everything i need to carry on the swap, the lack of funds will not stop me for a little while yet.

Anyway. The engine is finally in and supported by my engine mount. It's made up of a chopped up K10 mount and a bit of hefty angle iron welded together. It's not the best but i was running short on time so it'll do for now, seems sturdy enough anyway :)
IMAG1404 (Large).jpg
My umm masterpiece of an engine mount.. I'm not sure if i'd recommend copying the idea. It works though and hopefully can take the strain.

IMAG1406 (Large).jpg
Clutch cable back on and tightened up, it actually went on much easier than I expected and it feels really good :)

IMAG1408 (Large).jpg
One more thing ticked off the list. speedo drive is back in :)

IMAG1411 (Large).jpg
My lovely although slightly mouldy Micra interior. Soon to be replaced with my awesome 1L Super interior :D How i miss being behind the wheel of this beasty :(

IMAG1412 (Large).jpg

Engine in and being supported with no crane or jack!! Ohh and i stuck the radiator back in. should be able to use it and the K10 hoses without too much bother. Nice :)

IMAG1414 (Large).jpg
Reppin the MSC, only i can see it these days...

IMAG1415 (Large).jpg
Hmmm CG13 shot. I quite like this pic, don't know why i just do. Can't wait to get this car out of this soggy garage and back home.
(and you can see my Volvo 740 in the reflection on the windscreen!)

So thats about it for now. I did stick the battery back in and got the CG13 to turn over, i'll see if i can upload that video and if i can i'll explain a bit more.

So for now i've got fueling to sort, both pump placement and carb attacment and tuning, getting my MA dizzy hooked up. Getting a vacuum for my brake servo and sorting my exhaust. Few...


Right so i've finally go the video uploaded haha.

So while i was messing around with the Micra i thought since most of the wires have been connected it'd be interesting if i could get my CG13 to turn over. Now to be honest i've been a little worried about this as i wasn't sure that the MA10 starter motor would actually work with the CG10 flywheel, but it works fine no strange noises and turns over fantastically. All the gears work and can be selected as well so i'm really happy :)

I'm pretty impressed with the engine. It's had no oil in it since August and been sitting in a damp garage for months and it's fine. Yes i will put oil in it soon, and the gearbox too haha
 
Last edited:
Time for another update!
Not alot has been going on, however i did get the carbs in the engine bay to see if they would fowl on anything, turns out the clutch cable guide (the thing in the picture below) is catching on the intake trumpet. Bugger.. Hopefully i can cut the metal sleeve a little and hopefully that will sort it.
Another bonus is that my throttle cable will work perfectly with my new carbs so that is one less thing to worry about!
IMAG1428 (Large).jpg
The culprit, hopefully i can work around it...

IMAG1430 (Large).jpg
I also got the car down off the axle stands for the first time in months! Also the handbrake didn't lock on and i was able to roll it around. Which was very nice as i was expecting it to be stuck on.

IMAG1431 (Large).jpg
Back on all four wheels at last! Could have stayed on axle stands for a little longer but i feel like i've made more progress by taking it of them haha

IMAG1432 (Large).jpg
I forgot how low i had this car haha. Fantastic :D Should have to bring it up a little when i get my new wheels on, but thats fine with me.

IMAG1434 (Large).jpg
f This is all that remains of the CG dizzy. Been chopped up to take the MA dizzy. I was checking how far the drive cog had to come out from the body of the dizzy so i know where to cut the shaft down. Only thing is the dizzy sticks out a little far and i can't use the standard HT leads as they are a bit short.. Whoops. For now i've improvised and i'll show that a little later on.

Well thats another update done. Should make some real progress in the next few weeks. Main thing is i need to find a place to stick my fuel pump. Hopefully i can get away with sticking it in the engine bay.

Also if anybody has some 40 to 45MM (or anywhere inbetween) silicone hose lying around, please let me know. I need some to join up my carbs and i'm going to have to pay £36 if i buy it off ebay :( I only need like 7-15CM of piping (per carb) at a 45 angle and i really don't want to have to wast almost £40 for that little amount.
 
Clutch cable guide:
hammer/bend it

Dizzy: copy mine from the pic I posted dude, cut it down enough so it slides over the ma10 dizzy

:)


Sent from my iPhone using Tapatalk
 
Well the temptation to buy some super rare March parts was too strong. I have parted £120 for a set of March R clocks, the surround and all the wiring to go with it. I am very excited!
10286879_845801855528133_8328110589417602081_o.jpg

img_4.jpg
A picture from the brochure. Shame i'm not going to be able to take advantage of the Boost gauge. But that digital speedo does it for me. Good thing i can just about understand KPH!
 
They were advertised on the K10 facebook page. A bloke from Thailand was selling them. Looking at his profile he runs a business that sells old Jap car pars :)
 
Love them dials Ben. I would have been tempted at half of the asking price :) Only slightly very envious of you! Will look smart when its wired in mate

Thanks :) Well what convinced me to pay what i paid for them. Is that a few weeks ago somebody sold a set of K10 Micra rev counter clocks for £80!!! So for the extra £30 for a set of super rare March Turbo clocks i thought why not. That and the fact that they are just so dam cool! I cannot wait to get them up and running. Shame i don't have a turbo for that boost gauge though ;)
 
Thanks :) Well what convinced me to pay what i paid for them. Is that a few weeks ago somebody sold a set of K10 Micra rev counter clocks for £80!!! So for the extra £30 for a set of super rare March Turbo clocks i thought why not. That and the fact that they are just so dam cool! I cannot wait to get them up and running. Shame i don't have a turbo for that boost gauge though ;)
Wait what?! They were £110? I thought they were £250+import costs? Give yourself a use for the boost guage then ;)
 
Wait what?! They were £110? I thought they were £250+import costs? Give yourself a use for the boost guage then ;)

I made a small mistake on that one. They were £130 including shipping. I asked only for the clocks, surround and wiring. He was trying to sell the entire dashboard at that price. On top of that i beat him down a little on price. Although i assume I'm going to have to add a bit more money onto them for import costs...

Something i've just thought of though.. I'm probably going to get a speed warning chime with these haha
Oh I see. Presuming you're going to spray satin black all over your dash to make it suit? Jammy b*stard! I'd have bought it at that price. Nice buy Ben! Will it read in MPH with the UK car but label it as KMH? Look forward to seeing it in mate.
 
I'm not sure yet. I assume it'll read in KPH as it actually uses the standard speedo cable by the looks of things. Main problem is i cannot find any information about these clocks. So i hope i actually get the wiring i need otherwise it's going to be a very expensive ornament...

Ohh and i have a black dash ready and waiting to go in. I bought a full 1L Super interior not too long ago ;)
 
Unfortunately i've not done anything to the Micra this weekend. I'm waiting on some parts to turn up. However I asked Andy (@h701micra ) if he could sort out converting my MA dizzy to work with the CG. So the parts are getting sent of to him Monday so that is one less thing to worry about and one more thing ticked off the list.

Cheers Andy. I can't thank you enough :)

I do have a deadline of sorts and that is Japfest which is at the end of April. At the moment I'm not so sure if I'll be able to make it in the Micra but I'm sure as hell going to try too!
 
Just been told that my March clocks have been posted today. Should get them in the next week or two as it's coming over my airmail :)
12748108_1029232710471647_8888735515471494429_o.jpg
They've been nicely packed so hopefully they arrive in one peice
 
At long last i can make a proper update! I've spent the last week acquiring some much needed parts. First of all i paid a visit to my good friend Jordan who very kindly said i could swap alternators with him so i have the correct one for the K10 (apparently there are two types of K11 alternators). I also finally got hold of my 4-1 Manifold :D Been waiting for that thing since December. Might have had to go up to Birmingham for it, but it's deffo worth it! It only cost £80 too :D

IMAG1446 (Large).jpg
IMAG1447 (Large).jpg
IMAG1448 (Large).jpg
IMAG1449 (Large).jpg
It's good to see that the inside has been smoothed for better gas flow.

IMAG1451 (Large).jpg
I am loving my new manifold. So happy i got it. One less thing to worry about and i'm just thinking of all the extra power this adds over the standard manifold :) Best bit is, since i have a pre Aug 92 car i don't have to worry about running my CG with a Catalytic converter :D

IMAG1453 (Large).jpg
Put the headlights back on. Nice to see it's starting to get it's front end back together :)

IMAG1454 (Large).jpg
Test fitted my new manifold! It looks so good :)

IMAG1456 (Large).jpg

It was a little bit of a faff to get that belt on but it's nice to actually have my alternator attached, just need to sort the wiring on the plug and that is sorted :)

IMAG1457 (Large).jpg
Another picture, just for the sake of it. Tomorrow i'm chopping off that old downpipe and connecting up all the coolant pipes :) It's a good feeling knowing i'm making some real progress now.

I will be back with another update tomorrow :)
 

Attachments

  • IMAG1450 (Large).jpg
    IMAG1450 (Large).jpg
    375.1 KB · Views: 275
  • IMAG1452 (Large).jpg
    IMAG1452 (Large).jpg
    220.6 KB · Views: 271
  • IMAG1455 (Large).jpg
    IMAG1455 (Large).jpg
    312.3 KB · Views: 265
Fantastic work, you're keeping the K10 flag flying high right now, well done. If I get a K10 it will probably be your fault!! :)

Thanks Max and everyone else :) I'm not much of a mechanic and most of what i'm doing is all new to me. So i can't thank you all enough for the kind words. I really cannot wait to get back behind the wheel of the K10.

Also yeah get a K10 Max ;) You know you want to..... Actually better still fix that March!! It needs to be back on the road, especially for shows! :D
 
Back again for the second instalment of this weekends antics. Got a few things done that i have really been looking forward to doing. Also i rolled the K10 out of the garage for the first time since it went in. It was really good to see it the daylight however it does need a really good wash!

IMAG1463 (Large).jpg
Out in the daylight for the first time since December. I could actually see what i was doing for a change.

IMAG1465 (Large).jpg
Got the K11 alternator wired up. I used the bracket as an earth point as the k11 alternator is missing the terminal for it. Hopefully it should be fine like that. Ohh and the block connectors are only a temp measure until i can get close enough to a power socket to solder them properly. It works though as i now get a battery light on the dash!

IMAG1466 (Large).jpg
Got the oil pressure sensor wired in. Had to solder an extension to it.

IMAG1467 (Large).jpg

I had to use another block connector. Again this will be soldered when i can get to a power socket, but it works and the oil pressure light shows on the dash. Can't check it goes off as i don't have enough oil in the engine atm lol

IMAG1469 (Large).jpg
Chopped part of my downpipe off! At long last, that thing has been in the way for months and i only had a Jnr hacksaw to do it with as well!

IMAG1470 (Large).jpg
Got my coolant pipes on. I actually used the K10 coolant pipes and cut them down a little. Hopefully they should work fine and not cause any problems. If not i will stick a K11 rad in there and use the K11 piping.

IMAG1472 (Large).jpg
Heater matrix connected up. I used the K11 piping for this and cut down a little it works great. They are slightly to big in diameter so i will soon see if i get any leakage.

IMAG1474 (Large).jpg
I cut off the metal guide that was getting in the way of my carbs. Now they clear fine and doing this has not effected the clutch :)

IMAG1476 (Large).jpg
I did have to stick the other half further down haha. I will get it off the cable at some point.

Well that is about it for this weekend. Next on the list is finding a suitable location for my fuel pump and getting that wired in. Getting the carbs mounted up (which is going to be difficult as i might have to get an intake manifold made up as i don't think i can use my chopped up standard one). Sorting out an exhaust system, and loads of other things i can't quite think of at the moment.

All while trying to find a new job to fund it all!

Thanks for taking a look and I'll let you all know when the March clocks turn up :D
 
Today was the day that my March Turbo Clocks arrived!! They only took about a week and a half to get here from Thailand so not bad going. I love them so much, i just can't stop staring at them. Only thing that worries me is there is alot more wiring on the back of them compared to the normal Micra clocks and the PCB ain't in the best condition and i don't have a wiring diagram for them. Fun times ahead..
DSCF3252 (Large).JPG
DSCF3253 (Large).JPG
DSCF3254 (Large).JPG
DSCF3255 (Large).JPG
DSCF3256 (Large).JPG
DSCF3260 (Large).JPG
DSCF3261 (Large).JPG
DSCF3263 (Large).JPG
DSCF3264 (Large).JPG
DSCF3265 (Large).JPG
DSCF3268 (Large).JPG
DSCF3269 (Large).JPG
 
Back
Top