• Please only use these forums for blogs, they are not a discussion forum

PollyMobiles Rebuild

feeling sick n horrified at what I just discovered.

ok start off by draining the oil, no big lumps, just very fine metallic sparkles, good

DSC08267.JPG


that mysterious oil leak has returned again. cannot trace where its coming fromo_O
flywheel n most areas are dry, it just appears at the bottom edge of the sump n blown over onto the lower brace. sump gasket area also dry.

DSC08268.JPG
DSC08269.JPG
DSC08270.JPG


sump removed

DSC08271.JPG


pickup is ok

DSC08272.JPG


at bottom of the sump I see some thin strands of metal :(

DSC08274.JPG


windage tray still fixed solid to the crank cage, oh dear it must be the crank then :/

DSC08275.JPG


removing the rear tray was fiddly and having oil drip down onto ur face is no fun

DSC08276.JPG


the scraper is mostly fine, no major strikes

DSC08277.JPG


#1 has a slight rubbing

DSC08278.JPG


#2 fine

DSC08279.JPG


#3 fine but notice the metal debris

DSC08280.JPG


#4 fine

DSC08281.JPG


but to my absolute horror oh MY gawd ur right frank twas the big ends

DSC08282.JPG


#3 big end nut and cap has almost dropped out !!!

DSC08283.JPG


#1 shortly following behind !!!?!

DSC08284.JPG


fek heck, if it ran any longer it would've been a catastrophe :eek:

definitely sure they were tightened to spec during assembly but for sure I'll be using max threadlock on em from now on

tomorrow will be removing the other trays, bigend caps and assessing the bearings
 
Last edited:
hmm #3 seems to be a weak spot of this engines design.

btw a lot of outside threads saying don't thread lock the bigends, mains cos it'll upset the torquing etc blah blah but I'm gonna ignore this and carry on with franks advise cos if the nut loosened on its own, like in this case, then at least with thread lock it has to overcome the friction of the dried gunk adhesive (giving more time to shutdown once heard knocking) whereas without anything, it'll just freely rattle itself loose till the inevitable and u only have a few secs to react.
 
Well this is useful for me to see at least before i get on building for high comp, don't want the same happening to me! I'll remember to check no 3 extra too :p actually it was always oily cyl 3 on my 1l :/ may make for an interesting rebuild/ stretching the rings a bit (more of franks influence)

Hope it all comes together once youve re-locked those bigends though polly!
 
thx guys

new battery arrived tday, not that the extra £25 next day delivery was required, given the recent events and now JJC has em in stock, but meh we can't predict the future and crap happens

DSC08286.JPG


ooh its black. comes with 12.83v

DSC08287.JPG


lets hope that later on I find the bigend bearings are fine and just needs a good clean/flush, retighten with threadlock and reassemble
 
Last edited:
front windage tray out and oh my, so #3 nut did loosen off :/
found it at the bottom of the windage tray

DSC08288.JPG


removed caps #2 on left and caps #3 on right and gawd, the soft #3 bearing took most of the bashing so its really battered n spun round etc

DSC08289.JPG


all those metal flakes/swarfs in the pan are bits of the chipped/rubbed edges of the big end shells

DSC08290.JPG


no need to check the other two cos I will definitely need a new set of bigend bearings

so good news up to now is that the harder crank & big end journal surfaces has just barely been saved by the softer bearing shells.

but bad news is I'll need to order a new set of oversize big end bearing shells which could take a week and with my limited time after work, trying to also fit, assemble and complete the break-in in a rush by the 18th isn't realistic so afraid I'll have to miss PPC to save my engine and my health :(
 
Last edited:
The lows make the highs remember :) could be a lot worse!
i try not to think of the worst case scenario but I'm lucky to have a 2nd chance of saving the engine.

to have a simple bigend nut loosen and completely trash a totally new engine just down the road would be the ultimate kick in the own goal nuts
 
Paul you need to ditch the windage tray, you've had a bloody lucky escape

I don't think the windage tray was to blame cos it stayed solidly intact.
it was the bigend loosening themselves for some reason. whether I forgot to tighten them or not, won't be taking any more risk and just thread lock em this time
 
they just shook loose eh paul, i bet the factory assemble them with dry threads, and if you de-greased them first they would stay put :)
 
they just shook loose eh paul, i bet the factory assemble them with dry threads, and if you de-greased them first they would stay put :)

yeah I agree. I remember I only just wiped the threads with a rag (so the previous oil would prob still be deep in the stud & nut threads) and just screwed & tightened the nuts on.

degreasing the big end studs with the pistons inside and avoid spraying where I shouldn't is gonna be fiddly
 
just phoned erimus engines who I last ordered these bearings from and the guy will make afew enquiries on tues after bank holiday bout the bearing I'm after
 
Your a lucky so an so:) at least you never red lined it like 1 of my customers to clear the noise! lmfao:D

Lol that's just asking for trouble. Was the fella called Clarkson by any chance :p

I did think of maybe driving it bank home but good thing that idea vanished quickly and thought better of it to leave it alone, admit defeat and call for help n tow.
 
bah, work taking over again. so much stuff to do but so little time left for the car. plus the shop I called last week bout them bigend bearings are still enquiring.
this year has just been a bad year for the car throughout. when will the suffering end?

plus I only have until middle of june to use my moms car before it renewals so time's running out fast.
honestly I've been driving moms car more often than my own for the past year, might have as well just insure the whole year on the pug rather than mine :/
 
still not heard bout the bearings.

the old turbo elbow metal gasket was abit cracked so ordered a new one off ebay
for a tenner

DSC08291.JPG
 
Last edited:
For HG? I just scrape off any old gasket gunk with new razor blades then wipe the surface clean n dry n shiny with carb cleaner n clean shirt
 
What did you just post before haha metal gaskets for thinks such as turbos silly!

signature...please ignore anything I say...when using my phone it is either bad grammar or rubbish spelling.
 
Just got call bout the bearings. They had problems with supplier but promised they'll have em for Monday, nought I can do. Also its £40, thought it was £25 last time? What a depressing year imo. God give me some strength, gonna sleep it off
 
Also Mr Paul if the rear brake bias adjuster has nothing connected to it from the axle is it then getting the same flow as the front?

signature...please ignore anything I say...when using my phone it is either bad grammar or rubbish spelling.
 
Still looking at how servo works
And the brake system. It seems the main bias adjuster it the on on the rear axle eh?
signature...please ignore anything I say...when using my phone it is either bad grammar or rubbish spelling.
 
Unlinking the brake compensator from the susp arm, it no longer restricts/delays the rear plumbing so the same pressure will reach the front and rear ends at all times.

I think the unit is more of a safety device allowing the fronts to lockup first with full pressure before the rears receive it few secs later so u don't swap ends during emergency braking.

The actual bias will also be dependant on comparing the size and behavior of the front & rear brakes.
i agree :)
the front/rear bias is "designed in" eh paul (cyl size,s, and disc or drum size) and the load proportioning valve just dampens the flow to the rear if the car is unladen :)
 
Ta guys. I think it changed the drive slightly. The rear liked locking up more than I have experienced on other micras.

signature...please ignore anything I say...when using my phone it is either bad grammar or rubbish spelling.
 
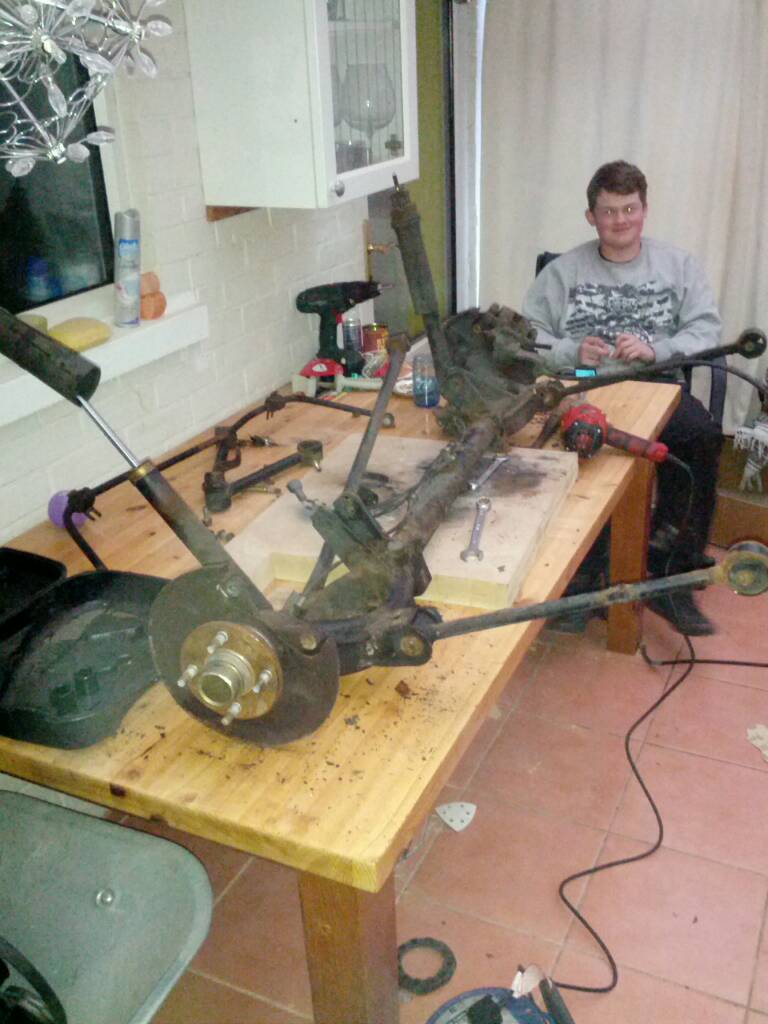
Oh frank and Paul. I did get a disk axle in the end. Cleaning it down and painting as we speak.
a9age4ed.jpg


signature...please ignore anything I say...when using my phone it is either bad grammar or rubbish spelling.
 
Modeled by mas the k10 owner. Just shows up here as usual to make it look like he helped with the build.

signature...please ignore anything I say...when using my phone it is either bad grammar or rubbish spelling.
 
I have my brake bias valve adjusted all the way to the top of the slot. I don't think there is enough suspension travel for it to ever be activated. I don't find my car overbrakes at the rear. I do however have competition pads in the front which may have effectively moved the effectiveness forward so to speak.
 
With GTIR brakes on the front and more forward bias as a result, there's less effort on the rear brakes for the same pedal pressure. Even with the compensator completely disconnected I have never personally managed to lock up the rears and have always maintained more rear bias is required to keep things in line.

Next time someone gets a stock K11 up on the brake tester, record down the brake weight figures and post them up as a starting point.
 
Is there noticeable differences between the setups on the facelift and pre facelift. I could get the stock one tested.
i think you,ll find that most k11 load valves have seized up long ago chris, and the members that lock up have it seized in the open position, my white car does,nt lock up, and here,s the valve on the red car (both pistons seized)

P5100986.JPG
 
Back
Top