• Please only use these forums for blogs, they are not a discussion forum

Micra track car build

Hey guys.

I've had many Micras over the years, mainly as dailys over winter as they're so trusty and reliable but a few years ago i took one to the track.

As you can see it was totally unprepared and bog standard but i had an absolute blast and ever since then i've wanted to build one as a cheap low cost track day toy so that's exactly what i have done.
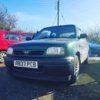
I bought a 1.3 gx pre facelift k11 as my base and i took it for a drive the other day to get some pictures, here it is -

jtme0m.jpg

euklug.jpg


My initial plans for the car are suspension, wheels and tyres and then take it from there.
I will also be documenting it on youtube if you want to follow it on there.
Here's my first video from going to pick it up


I also own an R32 Nissan Skyline that i'm restoring which i will be doing a lot of videos on.

I will keep the Micra build updated on here as much as possible too though and if anybody has any sugestions for suspension setups it's be greatly appreciated. I.e are Corsa coilovers any good for fast driving or are they just bouncy and horrible?
 
Last edited:
I run:

Front: Corsa Koni adjustable coilovers with 325lb springs with standard 1.3 anti roll bar -1 deg camber, whiteline castor kit on max

Rear: Saab 93 rear shocks with mk2 focus rear springs cut down to 5 coils and a whiteline rear arb

very budget spec if you go to a decent snap yard or trawl ebay, seems to be working ok
 
Small update on the micra but a update never the less.
Today i deleted the rear wiper arm.

A little video i put together this morning. First mod on my Micra but might be helpful for anybody thinking about dewipering their K11.
 
I've not made a lot of progress on the Micra over the last couple of weeks but i have had loads of new parts arrive for it.
Here's a little video of everything that's in store for it !!
 
So a few weeks ago i fitted some LED bulbs.
I upgraded the side lights, Numberplate lights and also the headlight bulbs to run LED.
This is what they look like:


I've had them in for nearly 3 weeks now and i couldn't rate them high enough. I've had HID's in a previous Micra as well as uprated Halogen bulbs and these are by far the best option.

If you want to get yourselves some the links are below.
H4 LED headlight bulbs: https://rover.ebay.com/rover/1/710-...RK%3AMEBIDX%3AIT&_trksid=p2057872.m2749.l2649

501 LED bulbs for the numberplate and side lights:
https://rover.ebay.com/rover/1/710-...893770&hash=item2129935303:g:yX4AAOSw~e5ZV4pe
 
A while ago i saw a k11 Micra at a meet with a normal MK3 golf front splitter on it. It didn't look like it fit very well and was sticking out all over the place but it actually looked quite good from a distance which got me thinking maybe i could modify the VR6 lip to fit as i had previously fitted one to my old 3rd Gen Civics without much trouble.
So i ordered one up from ebay and when it got here it was about a foot too wide. I decided i'd give it a shot anyway and see if i could chop it down to fit and bend it enough to follow the shape of the bumper.
I had to make a few modifications but here's what i did.


It wasn't a straight fit but i actually managed to get it to fit quite well minus the small crack.
It is a little time consuming and because the lip is made of plastic it is a little fragile but if you cut the scores deep enough on the corners it does bend to the shape of the bumper.

I ordered the lip off ebay, it was brand new. When i ordered mine they were £18 but have since gone up to £22.90 but for a brand new lip you can't really argue.
Here's where i got mine.
VR6 Lip: https://rover.ebay.com/rover/1/710-...RK%3AMEBIDX%3AIT&_trksid=p2057872.m2749.l2649
 

Attachments

  • 28379061_10156152377086575_4227348287185069268_n.jpg
    28379061_10156152377086575_4227348287185069268_n.jpg
    131.6 KB · Views: 563
Haven't posted on here for a while but i have been quite busy with the Micra build.
One of the latest mods i have done is i made an induction kit for the Micra, with all the parts it cost about £40 to make.
It was really simple and barely took any modification to make it fit.
I think the next step with it is to possibly make a heat sheild and cold air feed for it.
Anyway here's a quick video of what i did to make it and a pic of what it looks like.
 

Attachments

  • 32235582_10156346976076575_1866158067431768064_n.jpg
    32235582_10156346976076575_1866158067431768064_n.jpg
    123.9 KB · Views: 453
The next mod is the Gizfab adjustable panhard bar.
I was super happy with this, it's so well made and very easy to fit.
It's now sat on Corsa coilovers with Micra top mounts using spacers that i have had machined to make fit the Micra as i wasn't happy with using the Corsa top mounts and drilling into the strut towers. I had to play around with the suspension a lot to make sure it was ok and i've done a lot of testing. I'm fully aware that using the Micra top mounts is unsafe normally but these spacers enable you to accommodate the standard Micra top mount bearing and also take the load off the top mount. I'll be pulling them all apart again in the next few weeks to do a proper how to video on how i did it and have actually got some extra spacer kits made for anybody else that wants to do it this way.
Anyway as it's now sitting quite low i had to fit the adjustable Panhard bar to realign the rear axle.
Here's a how to on fitting the bar.
 
So after getting the Gizfab panhard bar fitted i had a free morning to get the wheel alignment as best as i could before going to Three Sister race circuit to do a little bit of testing with the Corsa B coilovers to make sure the home made spacers were doing their job properly and they did excellently.
Unfortunately my friends Rx8 had a bit of an issue as it broke down on the first lap due to him not emptying his catch tank before going on track so we spent a lot of the day cleaning oil out of his intake so he could get back on track in which time i was hoping to be filming so i could get a more detailed video of the day but unfortunately that didn't happen but hopefully next time i'll be able to get some better footage.
The Micra Performed great considering it's pretty much bone stock bar the Suspension, wheels and tyres.
Unfortunately any testing i had done up to that point had only been with me in the car and not much more than quarter of a tank of fuel and on the day i had filled up and had a passenger which was causing clearance issues and the tyres were scrubbing quite badly as you'll be able to hear in the video but it was just a day to do a bit of testing and was happy to find the problem now rather than when i had booked on a full track day.
So next job is to address the clearance issues either by roller the arches or fitting some over fenders (i haven't quite decided yet)
Anyway here's the footage from the day and a few pics
 

Attachments

  • 32440730_10156356339226575_1883607845245550592_n.jpg
    32440730_10156356339226575_1883607845245550592_n.jpg
    87.9 KB · Views: 467
  • 32312932_10156353955031575_5001091264133726208_n.jpg
    32312932_10156353955031575_5001091264133726208_n.jpg
    120.4 KB · Views: 493
A few weeks ago i managed to pick up a set of headlights and a front bumper in the correct colour for my car at my local scrap yard as the bumper that's currently on mine has been badly sprayed black and the headlight brackets are damaged so the lights are a bit wobbly.
So before i started fitting it all i decided to split the new headlights and spray the inserts black just to give the front end a bit more of an aggressive look.
Here's a video of the whole process in case anybody else wants to give it a go.
I'll upload another video once i get around to fitting the front end to the car.
 
I've been so busy with work recently so my Micra has been getting a little neglected recently but i finally managed to get a few days to do some work on it.
I finally got around to fitting the black headlights in the car and also fitted the Gizfab rear wing which i absolutely love.
It was super well made and fit absolutely perfect.
I'd definitely recommend it to anyone with a k11, here's a few pics and video showing them both fitted.
39468491_10156589521886575_5013383623743635456_o.jpg
39390527_10156589521541575_7622354326513516544_o.jpg
39400720_10156589521776575_508368392332247040_o.jpg
39306838_10156589521806575_3440588345367855104_o.jpg
 
I've had these Mirrors kicking about in my garage since last year with the intention of fitting them to my K11 Micra but it's just been one of those jobs i've never really got around to but the other day i decided to give it a go.
When i bought them i had full intention of mounting the mirrors to the wing but after seeing a couple of Micra's with them fitted i decided that it probably wouldn't fit with the look i was going for so i set to making some base plates so that i could mount them in the factory position.
My main goal with the car is to shred as much weight as physically possible so the mirrors i opted for are plastic rather than metal and i had an old aluminium road sign in the garage which was perfect as it was nice an light to cut the base plates from.
I cut templates from cardboard and then drew around them onto the metal and cut them out.
Here's a little video of what i did in detail and a few pics of the finished product.
41685475_267046337266230_6144499665288036352_n.jpg
41752254_665161007202134_1497007621205393408_n.jpg
41762127_542784466153596_3254494091106320384_n.jpg
41776940_2244581912442745_3485072485588664320_n.jpg
41804953_339582336613107_8213557141743599616_n.jpg
 
Last week i bought some LED rear tail lights off the MSC facebook group, i thought that they were going to be plug and play but unfortunately they weren't. After doing a quick google search i realised a few people have had the same problem when fitting them to a UK Micra due to the wiring being a bit different on the jdm models so i decided to do a quick video on what i did to solve the wiring problem.
Hopefully it's helpful for a few people.


I've attached a few photo's of what the lights look like fitted too, i think they've made a massive difference to the overall look of the car and i'm super happy with them.
I've had them on for just over a week now.
If anybody else is interested in them you can buy them brand new on ebay at the following link:
https://www.ebay.co.uk/itm/Micra-Ma...m=281224332721&_trksid=p2045573.c100505.m3226
42999617_1768909286565796_1805198097656053760_n.jpg
43009861_1608645549239293_2348062602157883392_n.jpg
43053195_2173105939599145_6527008417582678016_n.jpg
 
Yo guys.

So today i set to with a mod that i've been looking forward to fitting for a while, my Pulsar GTI-R short shifter.
I knew that it would fit as i'd seen people post that they fit the k11 Micra before but i had no idea how.
So i just went at it and tried to figure it out myself and it was really a lot more simple than i thought it would be.
The shifter is almost i direct replacement, it all bolts up in exactly the same way the old one comes out.
All that needed modifying was one of the linkages. Which needed the holes drilling out from 6mm to 8.5mm and the dowel from the original K11 Micra shifter just needed swapping into the new shifter with the washers provided in the kit.

Here's what it looks like all finished, it's made a huge difference. I'd say it's reduced the throw by more than 50% and although the gears are really close together now it has actually improved the feel and has made it much easier to find gears.
43879731_2186636048327759_416453966189035520_n.jpg


I also fitted a new gear knob as you can see. The gear knob is really nice and is made of carbon fibre but i did have a slight problem when fitting it. It came with a plastic thread adaptor which meant that when i went to to tighten it it up it just stripped the threads before i even got it tight which was slightly annoying. I've since super glued it in and it's been fine but thought it was worth mentioning.

Here's the links to where i got them both.

Shifter: https://rover.ebay.com/rover/1/710-...RK%3AMEBIDX%3AIT&_trksid=p2057872.m2749.l2649

Gear knob: https://rover.ebay.com/rover/1/710-...RK%3AMEBIDX%3AIT&_trksid=p2057872.m2749.l2649

As always i've done a video on the whole process as i feel it's easier to follow a video than try and explain what i've done with pictures.
So here it is, enjoy

 
Yo guys.

So today i set to with a mod that i've been looking forward to fitting for a while, my Pulsar GTI-R short shifter.
I knew that it would fit as i'd seen people post that they fit the k11 Micra before but i had no idea how.
So i just went at it and tried to figure it out myself and it was really a lot more simple than i thought it would be.
The shifter is almost i direct replacement, it all bolts up in exactly the same way the old one comes out.
All that needed modifying was one of the linkages. Which needed the holes drilling out from 6mm to 8.5mm and the dowel from the original K11 Micra shifter just needed swapping into the new shifter with the washers provided in the kit.

Here's what it looks like all finished, it's made a huge difference. I'd say it's reduced the throw by more than 50% and although the gears are really close together now it has actually improved the feel and has made it much easier to find gears.
View attachment 59646

I also fitted a new gear knob as you can see. The gear knob is really nice and is made of carbon fibre but i did have a slight problem when fitting it. It came with a plastic thread adaptor which meant that when i went to to tighten it it up it just stripped the threads before i even got it tight which was slightly annoying. I've since super glued it in and it's been fine but thought it was worth mentioning.

Here's the links to where i got them both.

Shifter: https://rover.ebay.com/rover/1/710-...RK%3AMEBIDX%3AIT&_trksid=p2057872.m2749.l2649

Gear knob: https://rover.ebay.com/rover/1/710-...RK%3AMEBIDX%3AIT&_trksid=p2057872.m2749.l2649

As always i've done a video on the whole process as i feel it's easier to follow a video than try and explain what i've done with pictures.
So here it is, enjoy

Good guide, I might use that in the future if I get around to buying one

Sent from my FIG-LX1 using Micra Sports Club mobile app
 
So i had a few weeks off work last week and was hoping to get loads done on the Micra but i ended up going on holiday and a few other things popped up so didn't quite get as much done as i hoped but i started pulling more weight out of the car.
I removed the head unit and aerial and made a blanking plate for the aerial hole.


I'm hoping to delete the sunroof some time this week as it's starting to leak quite badly now that it's raining more frequently so that is next on my list.
Also my BC coilovers arrived which i'm super excited to get on as i currently have Corsa B coilovers fitted and personally think they have totally ruined the car to the point where i hate driving it so i'm looking forward to getting the BC's on and being able to push the car hard again.

There's an arrive and drive day at my local track in a couple of weeks so i'm hoping to get the coilovers on by then and have the geometry set up properly so that i can take it for a bit of testing again and hopefully i will have resolved the issues i had last time.

44838535_10156758766976575_2609600950565863424_n.jpg
 
I finally managed to get the BC coilovers fitted today, while i was at it i decided to fit my Sparco NS2 wheels for daily driving.
They've made such a massive improvement over the Corsa coilovers.
The cars currently away getting the wheel alignment and corner weights done so i will do a review video once i get it back but here's a video of us fitting them.
 
Sp i got the car back from wheel alignment and it drives so much nicer than it did before so i decided to start addressing some of the faults that have developed since owning the car.
The first one was the front brakes, the caliper has been sticking slightly for a while now and the brake pads weren't far off needing changing so i decided to stick a new set of pads in despite probably removing them again in a few months to upgrade the brakes.
So here's me doing a little how to on how to change the brake pads in a k11 Nissan Micra
 
So the last month or so i have just been trying to catch up and fix a lot of the faults with the car. The most recent problem to happen was the dreaded K11 micra fan failure, so my interior fans stopped working on all settings apart from full power which is quite annoying as it's so loud on setting 4.
I've had this problem in the past with numerous Micras that i have owned but i've never really bothered to fix it.
So i thought this time around i'd actually look into it and do something about it. I knew it was just down to a simple resistor so i picked one up from ebay and decided to give it a go myself.
Here's a link to the product and a video of how i fixed it.
https://rover.ebay.com/rover/1/710-...RK%3AMEBIDX%3AIT&_trksid=p2057872.m2749.l2649

 
My latest fix on the Micra wasn't really a fix but more of a fault prevention. I've had numerous cars in the past that have broken down due to worn out parts in the ignition system and they always tend to do it when it's pouring down and pitch black.
I didn't want to be stranded at the side of the road again so i decided to service the ignition system before it brakes.
The car is 20+ years old now and although it hasn't done a lot of miles it looks like nothing in the ignition system has ever been changed other than the spark plugs so i decided to give it a little bit of a service by changing the Distributor cap and rotor arm, i also have a set of upgraded HT leads on the way but i am yet to fit them.
Here's how i fitted the dizzy cap and rotor arm.
 
So i bought my Micra a little Christmas present which also reveals what my plans are engine wise, check out the video to see what it is.
 
Today i finally got around to doing a job that i've been putting off for a while.
My sunroof has been leaking quite badly since i bought my Micra and i decided that it's probably about time i fixed it.
It was already siliconed shut so i decided to just blank it off as it would significantly reduce the weight.
I started by making a panel from galvanised steel so that it wouldn't rust and then i set to cutting it down to size, drilling the holes for the rivets and then painting the panel Satin black so that it didn't stand out quite so much.
Here's how i did it, i will hopefully fit it to the car tomorrow.
 
I had a few hours to kill the other night while in Manchester so i decided to do a little bit of exploring and get some pictures of the Micra, unfortunately i didn't have my camera with me but managed to get some alright shots with my phone.
I really need to get an exhaust sorted for it next, it looks so odd with the original exhaust still fitted.
48426423_2279525292281569_7077744016590110720_n.jpg
49605990_314389952751259_3942566543623192576_n.jpg
49793803_1914621545332574_1061971341571260416_n.jpg
 
I've had parts stacking up for the Micra for a while now so i've decided to get everything i have already bought fitted to the car before i buy anything else so i started with these boot straps and deleted the lock a catch to reduce the weight a little.
 
So i had a bit of a late night the other night modifying the MR2 seat rails to fit in the Micra, Luckily i had my friend Luke helping me as my welding isn't great. Took us about 4 hours but got there in the end. First one took a bit of figuring out but second one flew together once we knew what we were doing.
Anyway here's a video of the bucket seats being fitted.

 
Took the Micra out on track yesterday for the first time since fitting all of the handling mods and getting it set up properly.
It did seriously well considering it's still on the stock 1.3 engine and standard brakes.
Managed to get past 2 Octavia VRS's and actually started with a new BMW M5 behind me which never caught up.
Here's the full onboard footage.
 
Found a couple of Photo's of the Micra from the track day at Three Sisters.
As you can see it's still a little rolly, i think at some point i may try and get hold of some upgraded Whiteline anti roll bars but it's significantly better than the original setup. The BC coilovers were set on full soft as well so i could probably benefit from going a bit harder with them.
Overall i'm super happy with how well it handled though, i'm going to try and remove some more weight and get the front brakes upgraded before the next track day if possible.
53902792_392774064846069_8910930625112834048_n.jpg
54434167_392775748179234_445058160617586688_n.jpg
 
Yo guys.
Been a while since i've managed to do any work on this project but finally made a little bit of progress.
Got the Takata Harness fitted and also fitted the tow strap and big windscreen sticker.
62604034_484134152327153_2160317448367112192_n.jpg
62655896_411661299562847_2609317877861318656_n.jpg


I've got some track time planned at Three sisters again this month, then Teeside next month then the following month i'll be heading to the Nurburgring in it.
I've managed to book on a week that the Grand Prix track is open so hopefully i'll be able to do that as well as the nordschleife.

Here's the video of me fitting everything :)
 
Got the car back on Three sisters last weekend, it performed great yet again :)
Could possibly do with a tiny bit more power if i'm going to take it on a more open track but it was pretty much perfect on the little go kart track.
Here's a few photo's and some on board footage from the day.
IMG-5089.jpg
IMG-5096.jpg
IMG-5098.jpg


Yo guys.
Sorry for the lack of updates recently, i'm going to try and commit to spending at least 1 day a week on the Micra from now on so that i can speed up the process a little.
This week i spent the day making a start on cleaning up the engine bay, i've still got a lot to do but is looking slightly better already.
67311999_385442429035819_6427400674220179456_n.jpg


Here's a little video of what i did:


If anybody is interested in any of the items i fitted here's a full list of links to them :)
HT Leads: https://ebay.to/2JMggTs
HT Lead clamps: https://ebay.to/2M9IMju
Battery tie: https://ebay.to/2ZcQVHy
Dress up bolts: https://ebay.to/2y9yQhQ
Stainless steel rocker cover bolts: https://ebay.to/2SBCM4o
 
Took the car down to the Three Sisters again on Bank Holiday Monday and it did so well, did 3 sessions and never got passed by anything the whole time. So happy with the car and the way it is set up now, i can push it so hard.
I think the next step is going to be upgrading the brakes and adjusting the seating position to giveme more room so that i can take it on some bigger tracks.
Here's a few shots and some on board footage
IMG-9380.jpg
IMG-9152.jpg
IMG-9137.jpg


Been following you on the book of face :) Short technical circuits are great to cut your teeth on and to get the car setup with less risk of massive offs at speed.

You'll definitely find things lacking on faster circuits where more power and better brakes reward lap times.

I certainly favour the longer circuits given the power / weight of my car. I've been trying to make it to Silverstone, as that's my No.1 wish-list track, but something always gets in the way :sneaky:
 
Took the car down to the Three Sisters again on Bank Holiday Monday and it did so well, did 3 sessions and never got passed by anything the whole time. So happy with the car and the way it is set up now, i can push it so hard.
I think the next step is going to be upgrading the brakes and adjusting the seating position to giveme more room so that i can take it on some bigger tracks.
Here's a few shots and some on board footage
View attachment 64848View attachment 64850View attachment 64851


How much the Three Sisters cost?
 
Back
Top