Blog: K11 Midget race car project

Hi, I'm new here, not sure if this should be here or in a blog?
A few pics/vids and blurb about my project.
Midget car racing is a low cost racing series in Ireland which is regulated by Motorsports Ireland. Small single seater home built cars with small capacity engines race on a grass surface at one day events held over the summer.
Design criteria are simple with roll bar size, min and max dimensions for wheel base, track, overall length and body width. Naturally aspirated car engines range in size from 850cc to 1300cc, depending on class and engine location.
Harness, helmet and race wear must be certified but use by dates do not apply. All of which keep cost down and competition tight.
Midget car racing ireland

I decided on a 1L Micra K11 pre coil pack and got lucky and found a 98 (1 lady owner, it actually was) 47k miles car.


Dismantling and measuring the front end to be reused almost as is for the new rear end.


I decided to swap the lower control arms from left to right, which puts the pointy end just under the rollbar and keeps the frame small and forward.


I got the roll bar bent in a local engineering shop and built the rear frame around it and the engine, opting to connect straight to the engine without the rubber engine mounts, It'll be a little shaky but it's speed not comfort I'm after.

 
Last edited:
The rear end geometry is the same as the front end of the micra except the suspension struts are vertical to remove any castor angle and I added 2 degrees of camber by bringing the tops of the struts a little closer to each other. The steering rack is removed but the rod ends are attached to the frame so that I can adjust the toe+- and the ride height is lowered 65mm to give 150mm ground clearance.


Last edited:
I won't need an alternator as the races are about 10 mins long and I'll plug in to a slave battery between races and use a jump starter for starting, this kept the engine tight to the roll bar and the lower control arms into a bushing in the 40mm box connecting the bottoms of the roll bar.

Once I was happy with the rear end I set about designing the frame, I bought a Kirkey seat, got a Van Demien steering rack on ebay, a steering wheel on AliExpress and set up everything to get dimensions. I was aiming to be in the middle of the min max dimensions in the regs and keep everything as light and stiff as possible.

I used SketchUp to design a simple single line frame and then I used an extension in sketchup (DBS pipe tube profiles 2020) to convert this to a tube frame. I used 27mm mild steel tube 2mm wall.


Last edited:

Once I was happy with the design for the frame, I sent the drawing to all the laser tube cutting workshops I could find and only one came back to me with a quote, I got 41 tubes cut accurately, this was well worth it as it made assembling the frame much easier and the welds are good because the joints are much better than I would have done with a mini grinder.


I just spot welded each connection using 2.5mm rods and when the frame was complete my brother in law tig welded everything.
 
Last edited:
I bought the front end of an MX5 mk2 because it has the steering rack in front of the axel which helps to keep the car short and the hubs /uprights can take a 13inch rim. I just needed the front uprights but I copied all the dimensions for the steering, castor and and camber angles but with but with longer wishbones for slightly more travel in the suspension, only time will tell if all this works. I used the bottom ball joint which is a bolt on part with my own wishbones and i cut the top wishbone/ball joint and welded new wishbones on to it (with the ball joint in a bucket of water to prevent melting the polly).

I used m12 threaded bar joiner nuts to make adjustable rose joint attachments, my local machine shop turned them down for me.

 
Last edited:
While building the frame I leveled and bolted the rear frame to the floor and kept everything straight and square to the roll hoop. Once it was done, I set it up level at ride height and bolted it to the floor. I put back in the engine, control arms, rear suspension and wheels, adjusted the tracking to = and then I used the rear wheels along with straight edges and a builders laser to position the front suspension and wishbone mounting points and the steering rack. The upper and lower wishbones are connected to the frame parallel to the center line of the car and are parallel to the floor (level).


I positioned the front wheels and set the camber and castor angles using a spirit level. I made a box to go over and bolt on to the lower upright (hub) ball joint, this will also be the coilover suspension strut mounting point .

I fabricated the wishbones in place, this was slow and tedious but I think(hope) it's worked out ok and when I place the left and right wishbones over each other they are identical. I have a good bit of adjustment in the rose joints to fine tune the set up when (if I ever) I get to that stage.
 
Last edited:
Adjustable GAZ shocks are fitted beside the top front wishbone connection, I won't buy the springs until the car is finished and I know the weight.

The steering rack is clamped on to 30 x 30 angles welded to the front X brace along with the brake master cylinder (MX5) mounting plate.
The steering shaft is coupled to the the rack with a universal joint and the shaft runs through a bearing mounted to the dash X brace. The quick release steering wheel coupler is welded to a tube with grub screws that lock on to both flat sides of the steering shaft, this can be used to adjust the steering forward and back a little.
 
Last edited:
Rear subframe joins the top of the suspension struts to each other and to the bolt on bracket that holds on the lower control arms, this has to be removed to take in/out the engine and gearbox. It's also the anchor for 2 of the seat belts so I used 3mm tube. The radiator is connected to this also.


Most of the engine mounting points are low down, I wanted to hold the upper part of the block to the frame so bolted a 30mm angle to 4 available 8mm points on the head.

They aren't engine mounts but with the load spread across 4 points it should be ok, the angle is then welded to a tube welded to the roll hoop on both sides. This will also have the upper seat connection attached at some point.

 
Last edited:
The top of the rear suspension struts are fitted to a big ugly bit of angle iron, I think they started off as 150 x 150 x 10.

The center lines of the tubes intersect at the top of the strut, hopefully this will be strong enough.

With a lot of cutting and grinding they started to look a little less agricultural.

Apart form the John Deere green.
 
Last edited:
The seat rails are 80 x 40 box section cut to make 2 angles, these along with brackets on the lower frame rails are 2 more harness anchor points.

I got my machine shop up the road to make 2 bespoke washers to fit the holes in the Kirkey seat.

A countersunk cap head bolt spot welded into the off center hole is how the seat can be adjusted for height and length.

 
The gearbox gear linkage is welded to a box section welded to a universal joint welded to tube welded to another UJ connected to a piece of solid 10mm going through a 10mm tube welded through the bottom rail of the roll hoop connected to a 3rd UJ welded to the tube connected to the Micra gear stick and ball linkage, (good luck trying to understand that, but it works)


The clutch cable goes direct from the pedal to the the lever via a pully, I'll tidy this up on final assembly. You can see the radiator (aftermarket mini cooper) mounting plate here also.
 
I and many others have used mini radiators on our micra engined mini conversions so it should cool adequately, you may want to add a fan though, mine was a Spal fan, a bit more expensive but fits beautifully.
You can see it here:
 
I and many others have used mini radiators on our micra engined mini conversions so it should cool adequately, you may want to add a fan though, mine was a Spal fan, a bit more expensive but fits beautifully.
You can see it here:
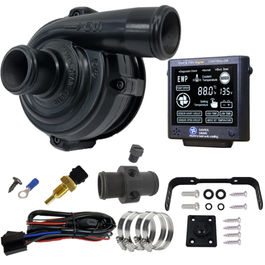
Hi FHM, thanks for the info, great to know others have used the mini cooper rad (and that there's more than 1275 looking at this😃). I've removed the water pump (for a variety of reasons) and I'm planing on using an electric Davies Craig EWP80 Alloy Electric Water Pump & Digital Controller Combo, I bought a fan to match also, not sure the make but it comes recommend by Davies Craig. I'll be posting it here once I get back home again in 4 weeks.
 
I've removed the water pump (for a variety of reasons) and I'm planing on using an electric Davies Craig EWP80 Alloy Electric Water Pump & Digital Controller Combo, I bought a fan to match also, not sure the make but it comes recommend by Davies Craig. I'll be posting it here once I get back home again in 4 weeks.
Others haven't but my rad got re-cored (higher fin count etc) but one of the other things they did was convert the rad to a triple pass. Thier thought was the water was passing through the rad too quickly, you may be able to do the same by slowing that pump down and avoiding the temptation to run it flat out.
Mine never overheated even with the previous rad, I was future proofing somewhat and it'd only start to creep up after 4 or 5 hrs (I live in Australia). Your ally rad, cool weather and short duration runs will be no problem.

Any reason you didn't go a motorcycle engine? I'd have thought they'd be considered ideal for this sort of thing. I do appreciate the cost and diy aspect though. Couldn't believe how many micras I saw in Ireland, pretty rare over here now.
Yes, the pump and controller are variable speed and it controls the fan also so it should be good.
The midget race car regulations are all about keeping costs down and competition tight, the engine has to be from a 1L or less road car and has to be naturally aspirated with a max venturi or choke size of 1&1/4 inch 32mm. I know that sounds small but the cars are small too and it's more about how light you can keep your build and skill behind the wheel.
The mini and K10 Micra are popular but the more recent cars are K11, Opel Corsa, starlet etc 16 valve reliable engines. Strip off the injectors and throttle body and make an adaptor for an SU or Webber carburettor. The K11 distributor version can be modified to use a mechanical electronic ignition or the later version retains the ECU for the ignition.

The Micra was/is popular here alright.
 
With the frame almost complete but still only tack welded it was time to strip it down for tig welding, cleaning, heat treatment and painting. I'll just sit in it for another size check (cue inner child complete with engine noises)

To make welding a little easier I made a simple rotisserie from scaffolding tube, key clamps and flat trolleys.
 
Last edited:
Body work. The plan is to infill the frame with panels of aluminum so most of the frame is visible, I got a local engineering co. to laser cut 126 tabs from 2mm sheet and I made a simple jig to position them so that the outside face of the aluminum will be on line with the center of the frame tubes.


This bit was slow and a bit boring but hopefully worth it.

This car is the inspiration (copying, plagiarism), the club have been very helpful and welcoming, I've been going to races and asking way to many questions but they are great and I'm looking forward to getting stuck in with them.
 
Last edited:
Welding. My brother in-law is a fitter with the power company and a very good tig welder, he acquired some high quality rods and he got the whole thing done in one long day, thanks Jim.

Then it was, grinding, sanding degreasing and washing with acetone to get it ready for heat treatment and powder coating.

A neighbor and family friend has an agri tyre and wheel business and kindly agreed to let me use his powder coating plant. The frame got a 45 minute soak at 200 degrees C to relax all the welding stresses after which it got a grey rust inhibitor primer powder coat.

This was the first time I'd considered what color to use, the choices were Massey Fergusson red or grey, JCB yellow, CAT orange, New Holland blue or John Deere green.

This has a total weight of 66.7kg which I think is ok but i don't have anything to compare it to yet.
 
Last edited:

Next up, final assembly, engine cooling, carburetor fitting, suspension, flooring, pedals, steering........

The Micra thermostat housing was pointing forward to where the rad used to be but also into the seat location so I replaced it with an adaptor I had turned to connect the pipe going to the top of the rad.

This pipe has the thermostat adaptor which is connected to a digital controller which runs a new electric water pump and rad fan. The water pump fits snug under the inlet manifold with a 90 degree bend on the outlet connecting it to the pipe going to the old water pump housing. I removed the old water pump, pully and belt and I made a new cover plate in its place. There's no V belt now that I don't need a water pump, alternator or power steering pump and I'm hoping this might help a little with power. The main pully will stay as it has the timing marks on it and I think it's needed to balance the crank shaft or something like that.
 
Last edited:
The distributer had to be altered to be mechanical electronic ignition with a coil which means I wont need to use the ECU, have any issues with the immobilizer and a lot less wiring. I sent it to H&H Ignition Solutions in the UK who sent back this with fitting instructions and a new coil.
www.h-h-ignitionsolutions.co.uk
 
Last edited:
The regulations say you can alter the exhaust back as far as the first bolt on item to the exhaust manifold, so I cut the top section of the catalytic convertor and welded (with cast rods I got on ebay) a plate that the first section of a new 2" exhaust is welded to.

I used 2 30° and 2 60° Jetex bends and a Jetex Universal Silencer to go under the sump gap and point up behind the engine. An exhaust clamp is welded to the rear gearbox mounting bracket.
 
The engine has to be naturally aspirated with a max choke size of 1 & 1/4". I sourced an SU carburetor from a1970's mini 850cc and made an adaptor made from a 32mm but weld 90° bend and 6mm flat plate connected to the inlet manifold where the throttle body was, the bend is cut to the angle so the float chamber of the carb is vertical.

The carb end of the adaptor is the same bore as the carb

and the other end is die grinded out as much as possible and polished, sort of.
 
Rear suspension. The box section lower part of the rollbar has a tube welded in place.
This has a push fit polyacetal bush inserted and the front round part of the lower control arm fits in to it.


This is the RHS, note the sump alterations (hammered in) to make room for the lower control arm.
 
Using the stock micra front suspension struts would mean the ride would be very hard (Micra 820kg midget car 340ish kg) and sitting at the top of the struts travel range with no drop available. I die grinded away the weld of the lower spring seat to allow it to drop down the strut completely.

Then I compressed the springs to the right position to get 150mm ground clearance and I used a heavy duty pipe clip to support the spring seat at it's new height. This gives me approx 60mm of drop in the rear suspension and a more nimble ride that's easily adjusted.
 
Last edited:
I asked a local kitchen counter top company if they would measure for the panels using a Proliner 3d measuring machine.

They gave me a folder with a .dwg drawing for each panel. I got these laser cut from 2mm aluminum.

They mostly fitted well, I just needed to grind away a little at the corners for the welds and after I'd rivetted them in place I ran a small bead of clear silicone inside each panel edge, this helped hide any gaps and will help with cleaning the car.

The bonnet is 3 triangles rivetted together and it's held in place using 6 Dzus Panex fasteners.
 
Last edited:
The fuel tank is made form 2mm aluminum with a cap I got from Demon Tweaks, my mate Johnny welded it for me, he's really good.

There's a swirl pot underneath with an 8mm pipe connection

It's fitted behind the seat with the exhaust behind it, I'll wrap the exhaust and put a heat baffle covering it to help prevent heat transfer through the seat into my back.
 
Johnny also welded the air box connection, its a piece of 70 x 35 aluminum box with a short piece of pipe for the air filter to attach to.
The other end is drilled to fit over the inlet horn of the SU carb with the threaded bar of the inlet horn going through the top and a 6mm nut holding everything in place.

The battery cradle is cut from 80 x 40 box with a flat bar bracket bolted to where the clutch leaver was. I wanted to keep the battery separate from the fuel tank but I didn't want to put it in the front of the car. Having it here will keep all the wiring runs short and it's a small, light weight lithium battery.

I made a protective cover for the radiator from the door of an old coms cab I'd stashed away because I liked the look of the perforated steel, I think/hope it doesn't restrict the airflow to the rad.
 
Last edited:
I've used the wing mirrors from the micra mounted on an aluminum angle rivetted to the side panel, they can fold in also.

They're very effective and for now I don't mind the (mickey mouse) look of them.
 
I wasn't happy with the location of the brake master cylinder, it was exposed and could/would be easily damaged in any front end contact, and I would need to make some sort of protection around it, = more weight.

I managed to relocate it inside the frame just in front of the brake pedal, a small portion of it protrudes under the aluminum floor but it should be grand...

This means I can make the front nose section much (90mm) shorter than planned and lose some weight by cutting away the previous mounting plate.

I will need to mount the brake fluid revisor remotely and run pipes to the master cylinder but I think it's worth the effort.
 
Last edited:
Back again. I got the car finished and raced it in 3 events in the championship. It did really well, picking up 4 wins and a 2nd on day 1, then 3 wins and a 2nd on day 2, and 2 wins a 3rd and a 4th on the last day.


Back
Top